Ever get bored of the same old coconut chutney with your idlis and dosas?
Here’s a bold, minty twist you’ve got to try. This Mint Coconut Chutney is vibrant, refreshing, and packs a gentle heat that keeps you going back for more. It’s not just a side; it elevates the whole meal.
Trust me, once you try this, it’ll become your go-to dip for all your South Indian breakfasts and snacks. Let’s dive in!
Why This Mint Coconut Chutney Is a Must-Try
- South Indian soul food with a zing.
- The freshness of mint meets the nuttiness of coconut and roasted dals.
- Perfectly spiced, gently tangy, and super aromatic.
- Comes together in 15 minutes flat—start to finish.
If you’re looking to upgrade your chutney game, this is your new go-to.
What Makes It So Good?
- Mint Leaves: Adds a cooling, refreshing flavor that balances the rich coconut.
- Fresh Coconut: Creamy and naturally sweet—this forms the luscious base.
- Garlic & Ginger: Adds warmth and depth.
- Green Chillies: Bring in the right amount of kick.
- Tamarind: A touch of tang for balance (don’t skip this!).
- Roasted Gram & Dals: Nutty and protein-rich; give the chutney body and texture.
- Tempering: The mustard, urad dal, red chilli, and curry leaf tadka? That’s what seals the deal.
Let’s Talk Through the Process
Start by heating a bit of oil—just a couple teaspoons—in your pan. Toss in your chana dal and urad dal. Roast these till they’re golden and fragrant (you’ll smell the nuttiness).
Next up: cumin seeds, chopped ginger, peeled garlic, tamarind, and chopped green chillies. Sauté everything for a minute or two till the garlic gets that slight golden edge.
Now it’s time for the hero ingredient—mint leaves. Throw in a generous handful, and sauté till they just wilt. You’re not trying to cook them down too much—just enough to remove rawness and bring out the aroma.
Add the roasted gram and fresh grated coconut. Give everything a final toss and turn off the heat. Let this cool down slightly before grinding.
Once cooled, transfer to a blender with salt and just enough water to get a creamy, spoonable consistency. Blend until smooth but with a bit of texture—you don’t want it too pasty.
Pour into your serving bowl and get ready for the grand finish: the tempering.
Heat a bit of oil, add mustard seeds and urad dal. Once they crackle, switch off the flame and toss in broken red chillies, curry leaves, and a pinch of hing. Pour this over your chutney and stir it in.
Pro Tip: If you want an even brighter flavor, add a few drops of lemon juice right before serving.
What Goes Along
- Idli & Dosa: Classic pairings. The chutney clings beautifully to soft idlis and crisp dosas.
- Adai & Paniyaram: The slightly bold flavor of mint complements the fermented taste of adai.
- Upma, Pongal, or Semiya: This chutney cuts through richness and adds a fresh note.
Serving Suggestions
Serve it fresh and slightly warm for the best taste. Store leftovers in the fridge and use within 2 days. It also freezes well—just skip the tempering and do it fresh when reheating.
Bulk & Meal Prep
Yes, you can make this in bulk! Scale up the ingredients and store in small airtight containers. Freeze for up to 2 weeks. Just temper fresh before serving.
If you’re looking to bring new life to your South Indian meals, this Mint Coconut Chutney deserves a spot on your table. Give it a try—and watch how a humble chutney can steal the show.
Other Chutney Recipe you might like:-
- Peanut Chutney
- Tomato Mint Chutney
- Tomato Peanut Chutney
- Mango Coconut Chutney
- Onion Chutney
- Raw Mango Chutney
- Chammandhi (Coconut Side Dish)
- Spicy Mint Chutney (Pudina Pachadi)
- Toor Dal Chutney (10 minutes)
Mint Coconut Chutney
Description
This mint coconut chutney is fresh, zesty, and super easy to whip up! Made with roasted dals, garlic, green chillies, and plenty of fresh mint, it's the perfect sidekick for your South Indian favorites like idli, dosa, adai, and paniyaram. The tempering at the end adds that extra punch of flavor, making it totally irresistible. Whether you’re new to chutneys or a seasoned pro, this one’s a keeper. Give it a go—you’ll be making it on repeat!
Ingredients
For tempering
Instructions
Prep Work
-
Wash mint leaves
Gently rinse the mint leaves under cold running water and pat them dry.
-
Chop ginger
Peel a small piece of ginger and chop into rough chunks. -
Peel garlic
Remove the papery skin from the garlic cloves. -
Chop green chillies
Slice green chillies into pieces; remove seeds if you want it milder. -
Break dry red chillies
Snap the dry red chillies into two or three pieces.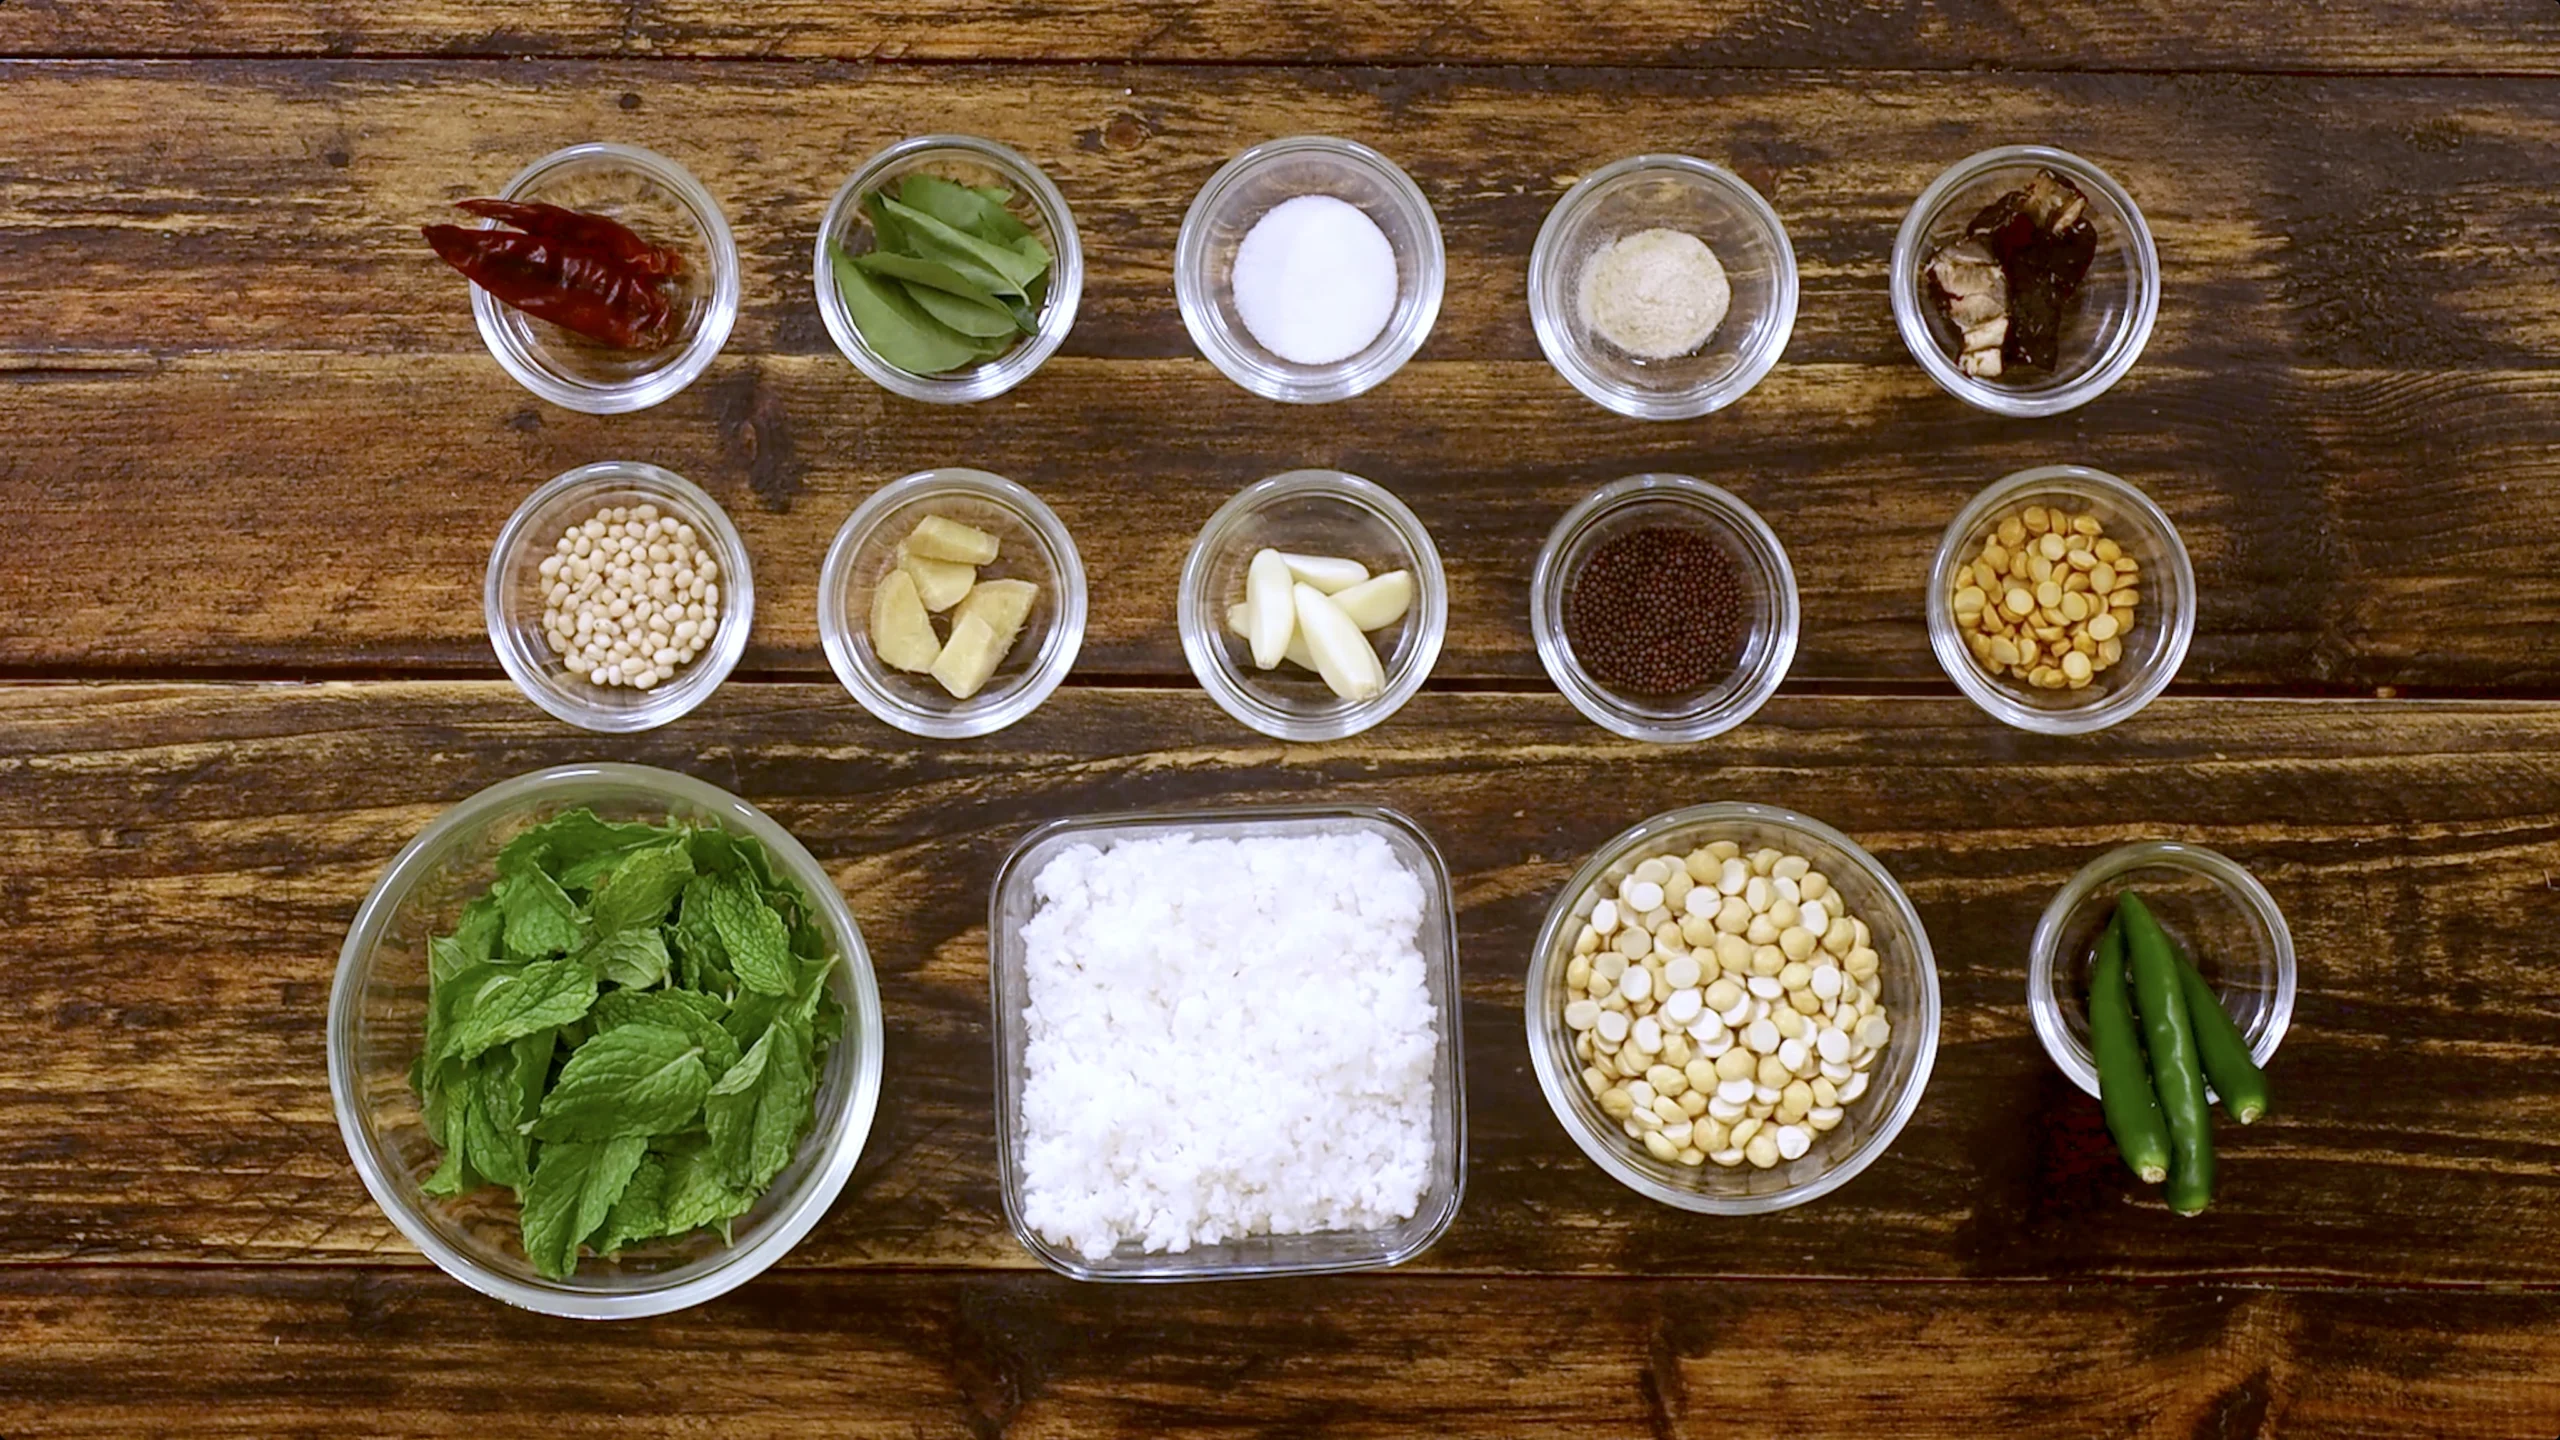
Method
-
Roast dals
Heat oil in a pan. Add chana dal and urad dal and roast on medium until golden and fragrant.
-
Roast spices & aromatics
To the same pan, add cumin seeds, chopped ginger, garlic, tamarind bits, and green chillies. Roast briefly, stirring, until aromatic.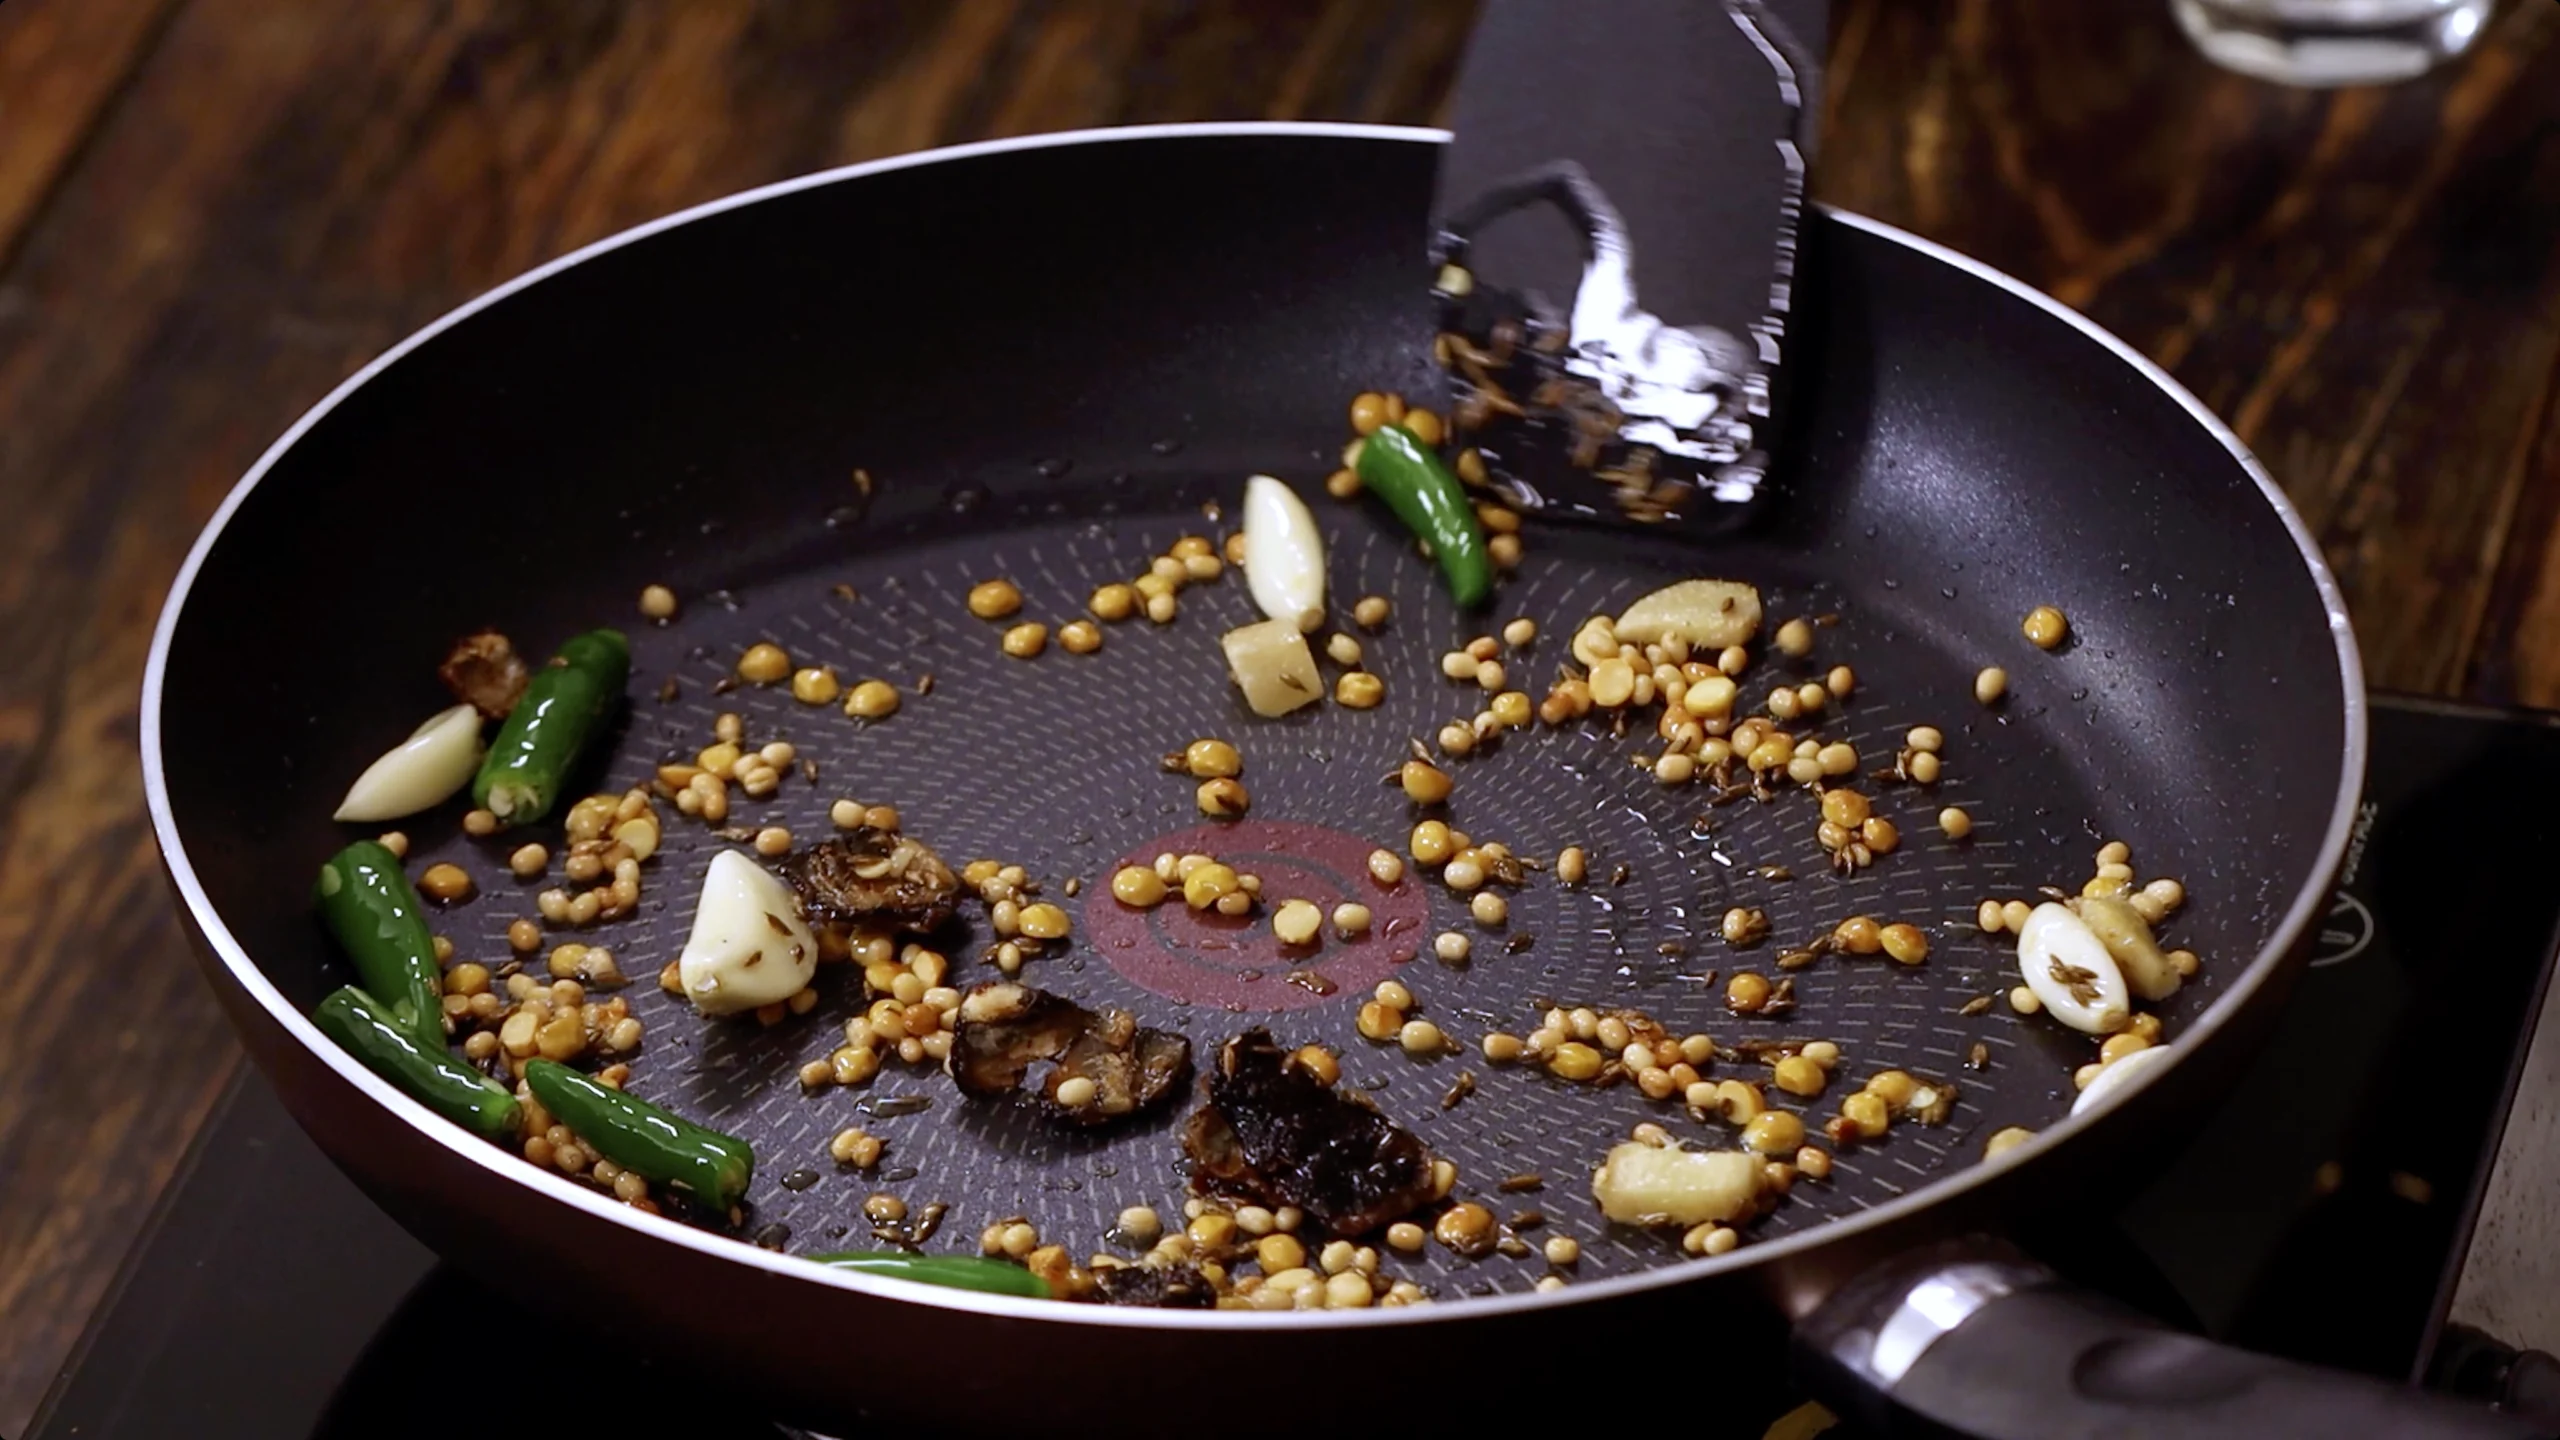
-
Sauté mint
Lower the flame, add mint leaves, and sauté just until they wilt. -
Combine coconut & gram
Add roasted gram and grated coconut. Stir to combine and turn off heat.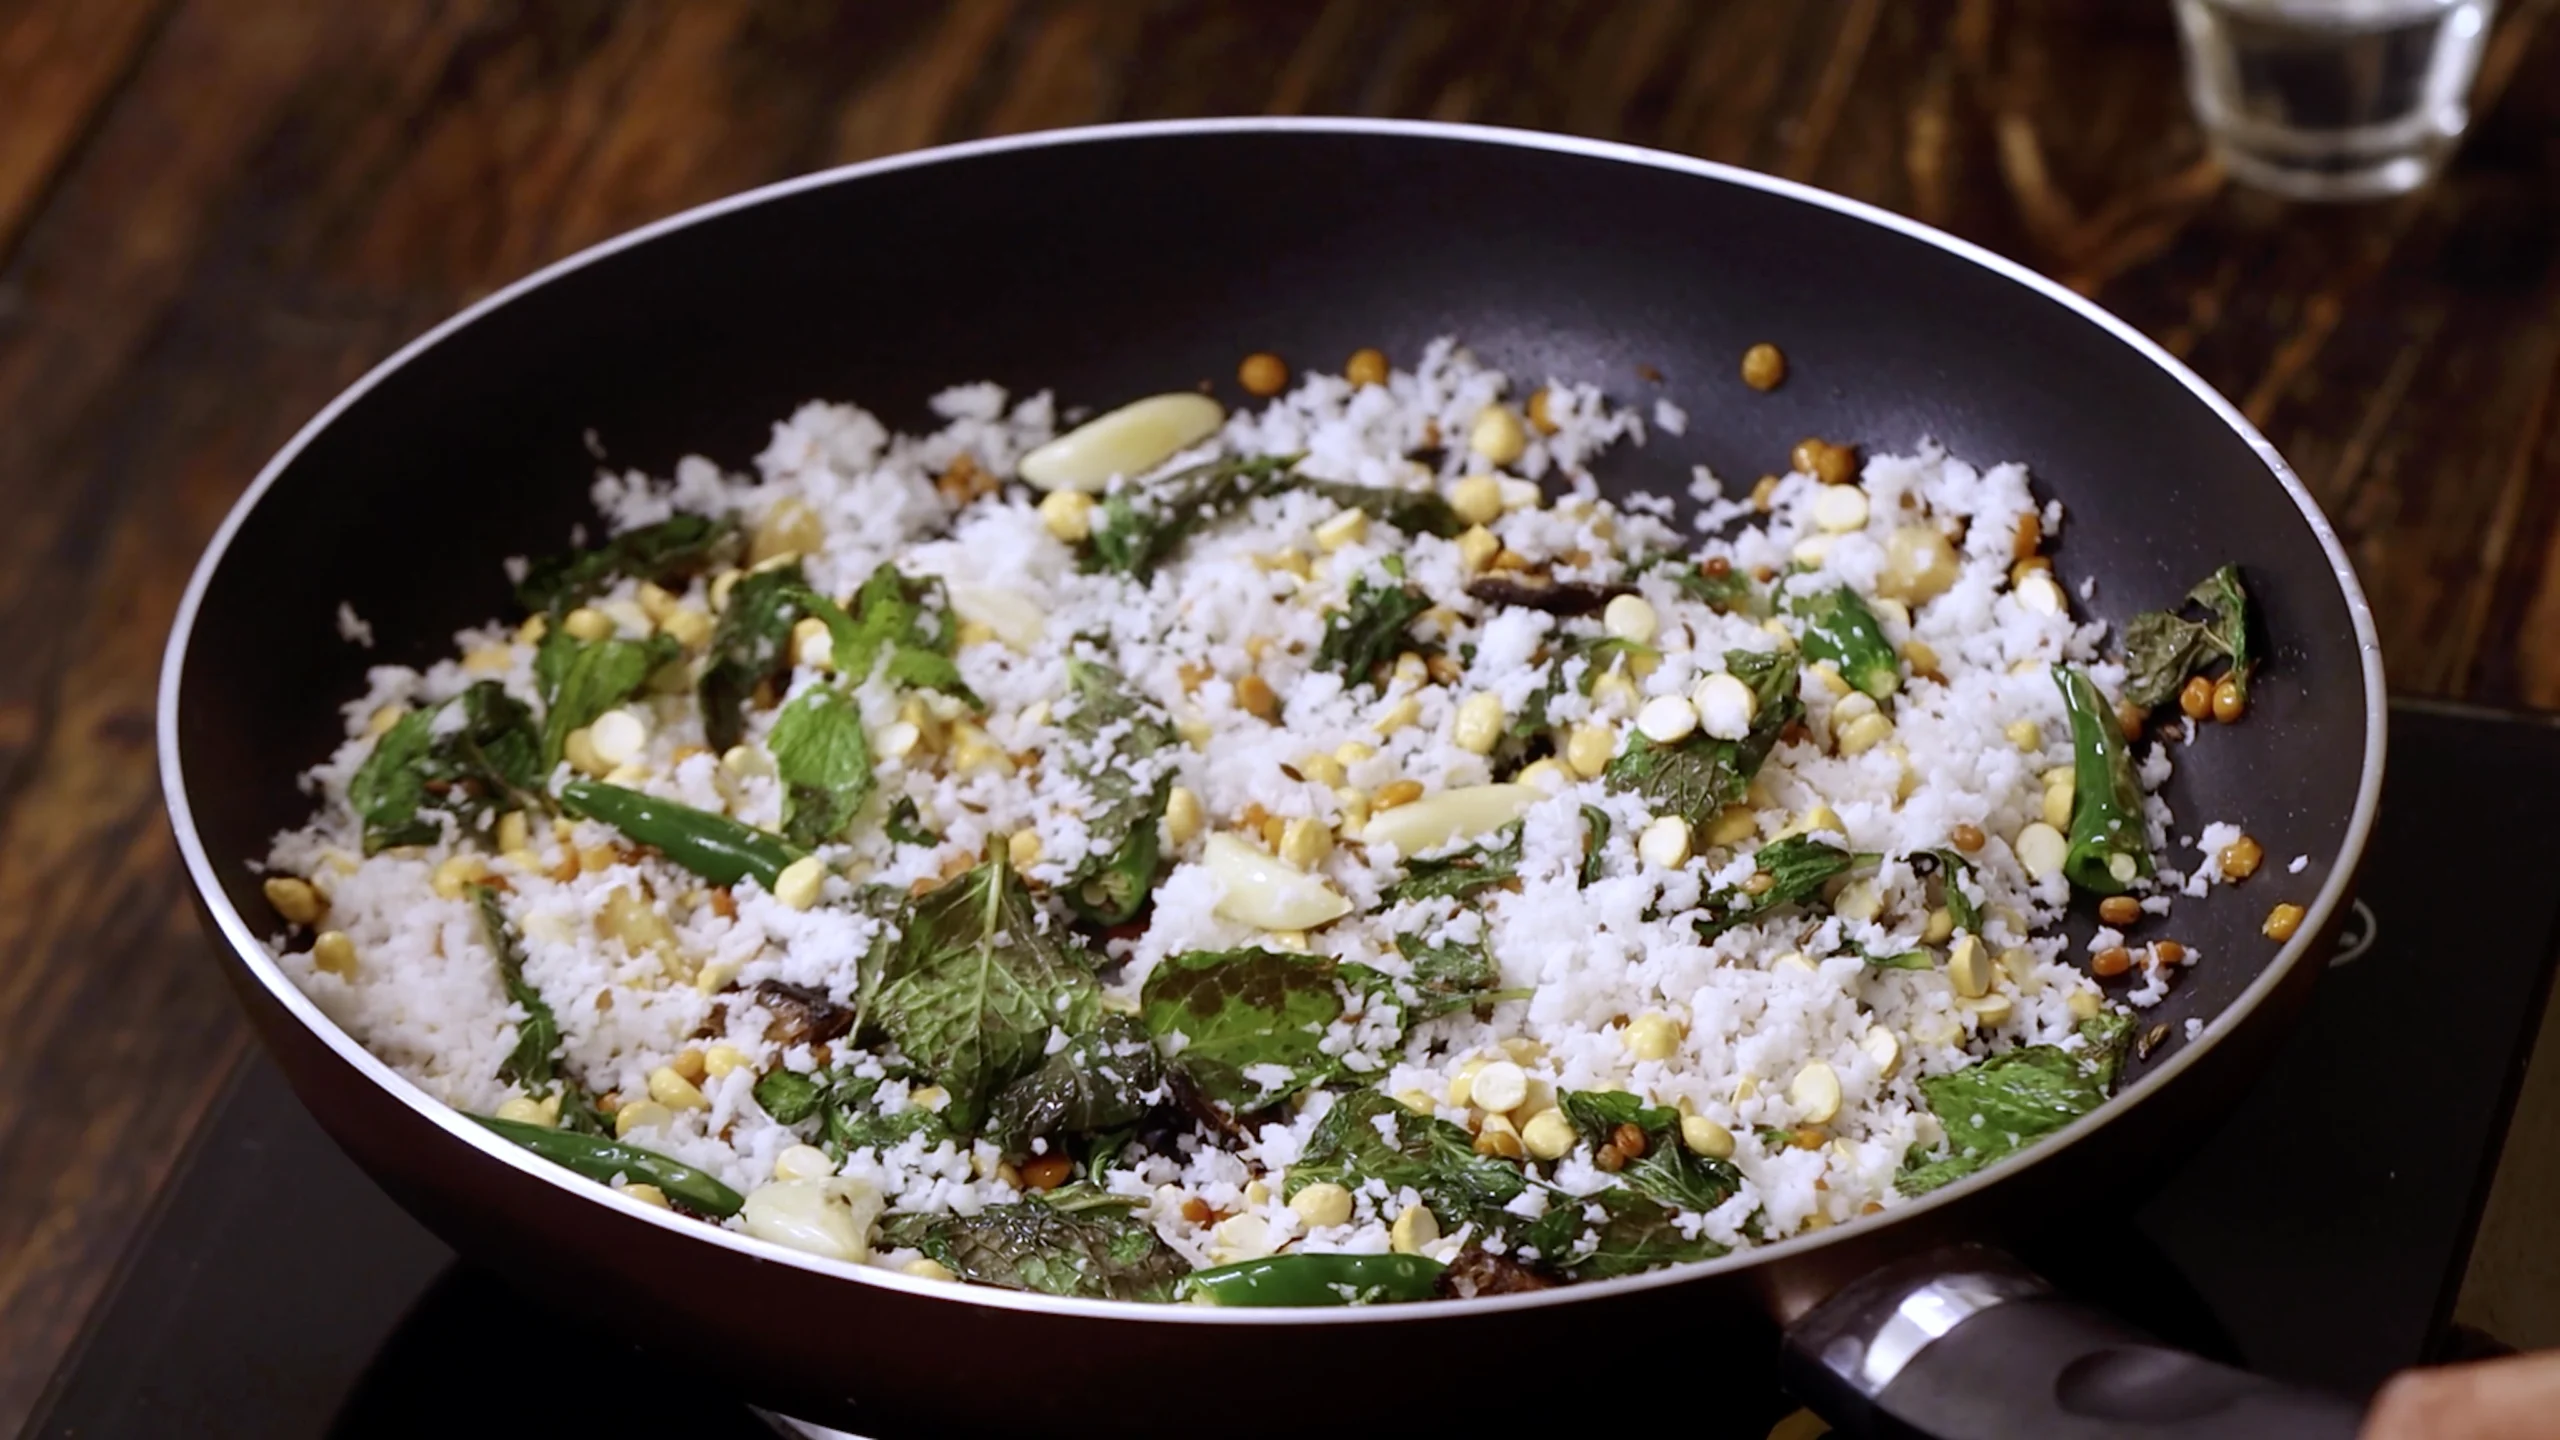
-
Cool & grind
Spread the mix on a plate to cool. Once cool, transfer to a grinder, add salt and water as needed, and grind to a smooth paste. -
Temper chutney
Heat a little oil, add mustard seeds and urad dal. When they pop, turn off heat, stir in dry red chillies, curry leaves, and asafoetida. Pour over chutney.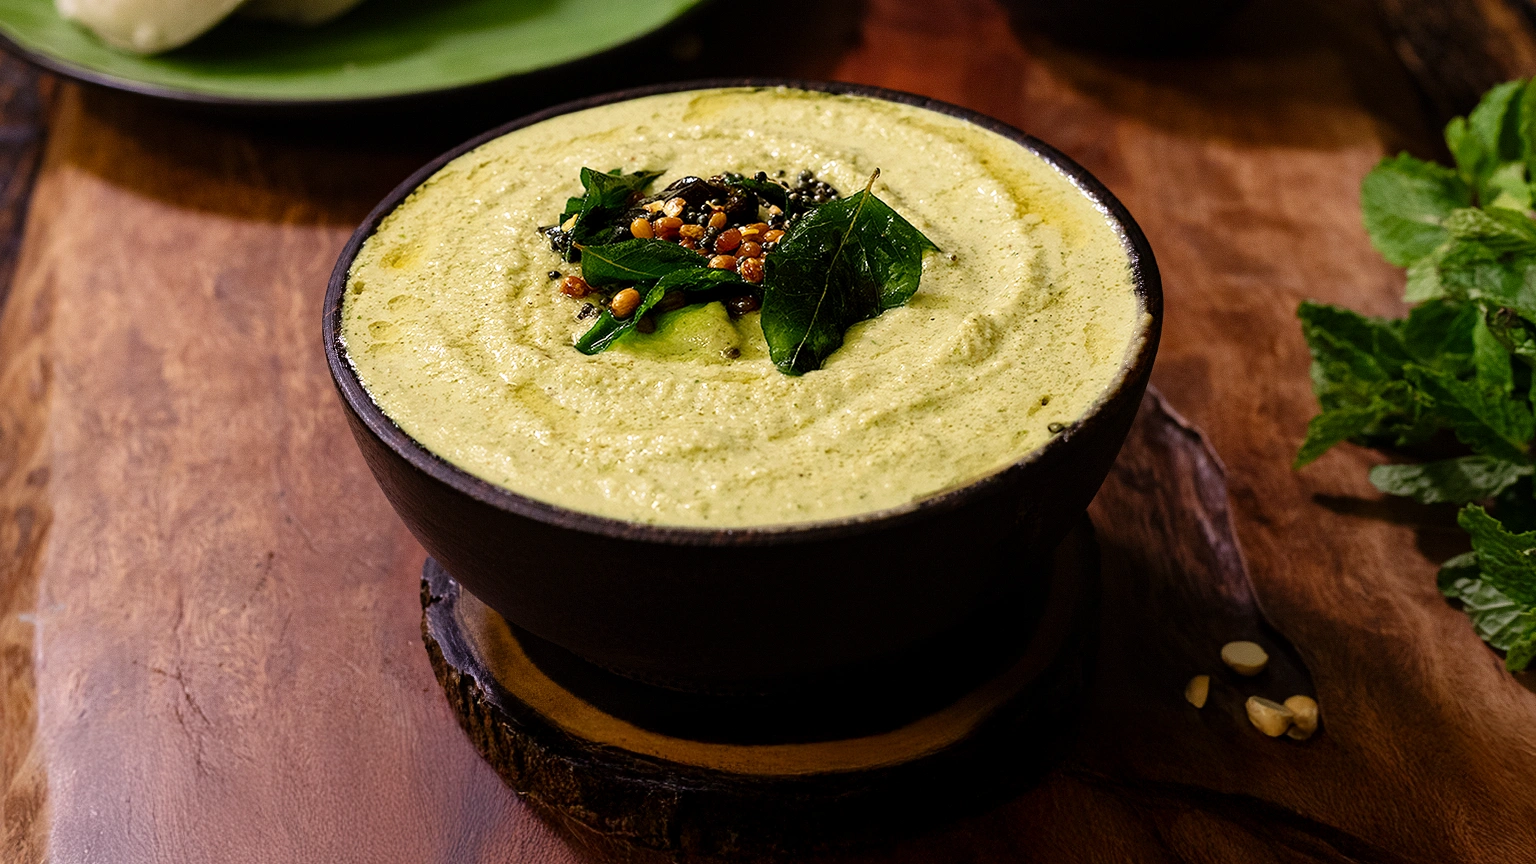
Equipment

 5")

Affiliate Disclosure: This post contains Amazon affiliate links, i.e., when you buy any product using the links below, we get commissions. but it doesn’t cost you anything extra. If you do purchase any product using the given links, we thank you in advance!
Nutrition Facts
Servings 4
- Amount Per Serving
- Calories 120kcal
- % Daily Value *
- Total Fat 8g13%
- Saturated Fat 6g30%
- Sodium 200mg9%
- Total Carbohydrate 10g4%
- Dietary Fiber 3g12%
- Sugars 2g
- Protein 2g4%
- Vitamin C 5 mg
- Iron 0.7 mg
* Percent Daily Values are based on a 2,000 calorie diet. Your daily value may be higher or lower depending on your calorie needs.