

Imagine perfectly round, golden-brown orbs with a crispy exterior that gives way to a soft, fluffy interior studded with crunchy mustard seeds, sweet bits of onion, and the occasional burst of green chili heat. That’s rava paniyaram—South India’s answer to when you’re craving something savory, filling, and utterly satisfying but don’t have hours to spend in the kitchen. The beauty of these little spheres is in the contrast: that crackly, oil-crisped outside against the tender, slightly tangy inside from the curd. The aroma of tempering—mustard seeds popping, curry leaves crackling, asafoetida releasing its pungent magic—fills your kitchen within minutes. They’re perfect for breakfast, as an evening snack with chai, or even as a light dinner when paired with a good chutney.
Paniyaram (also called paddu, appe, or gundponglu depending on which South Indian state you’re in) has been around for generations, traditionally made with leftover dosa or idli batter. But this instant rava version is a modern adaptation for those of us who don’t always have fermented batter on hand. It’s the “I need something now” version that requires no planning, no fermentation, just a quick mix and you’re cooking within an hour. My grandmother would probably shake her head at this shortcut, but even she’d admit these taste pretty incredible for something so quick. The paniyaram pan itself—that distinctive cast iron skillet with hemispherical molds—creates that perfect shape and even cooking that you just can’t replicate any other way.
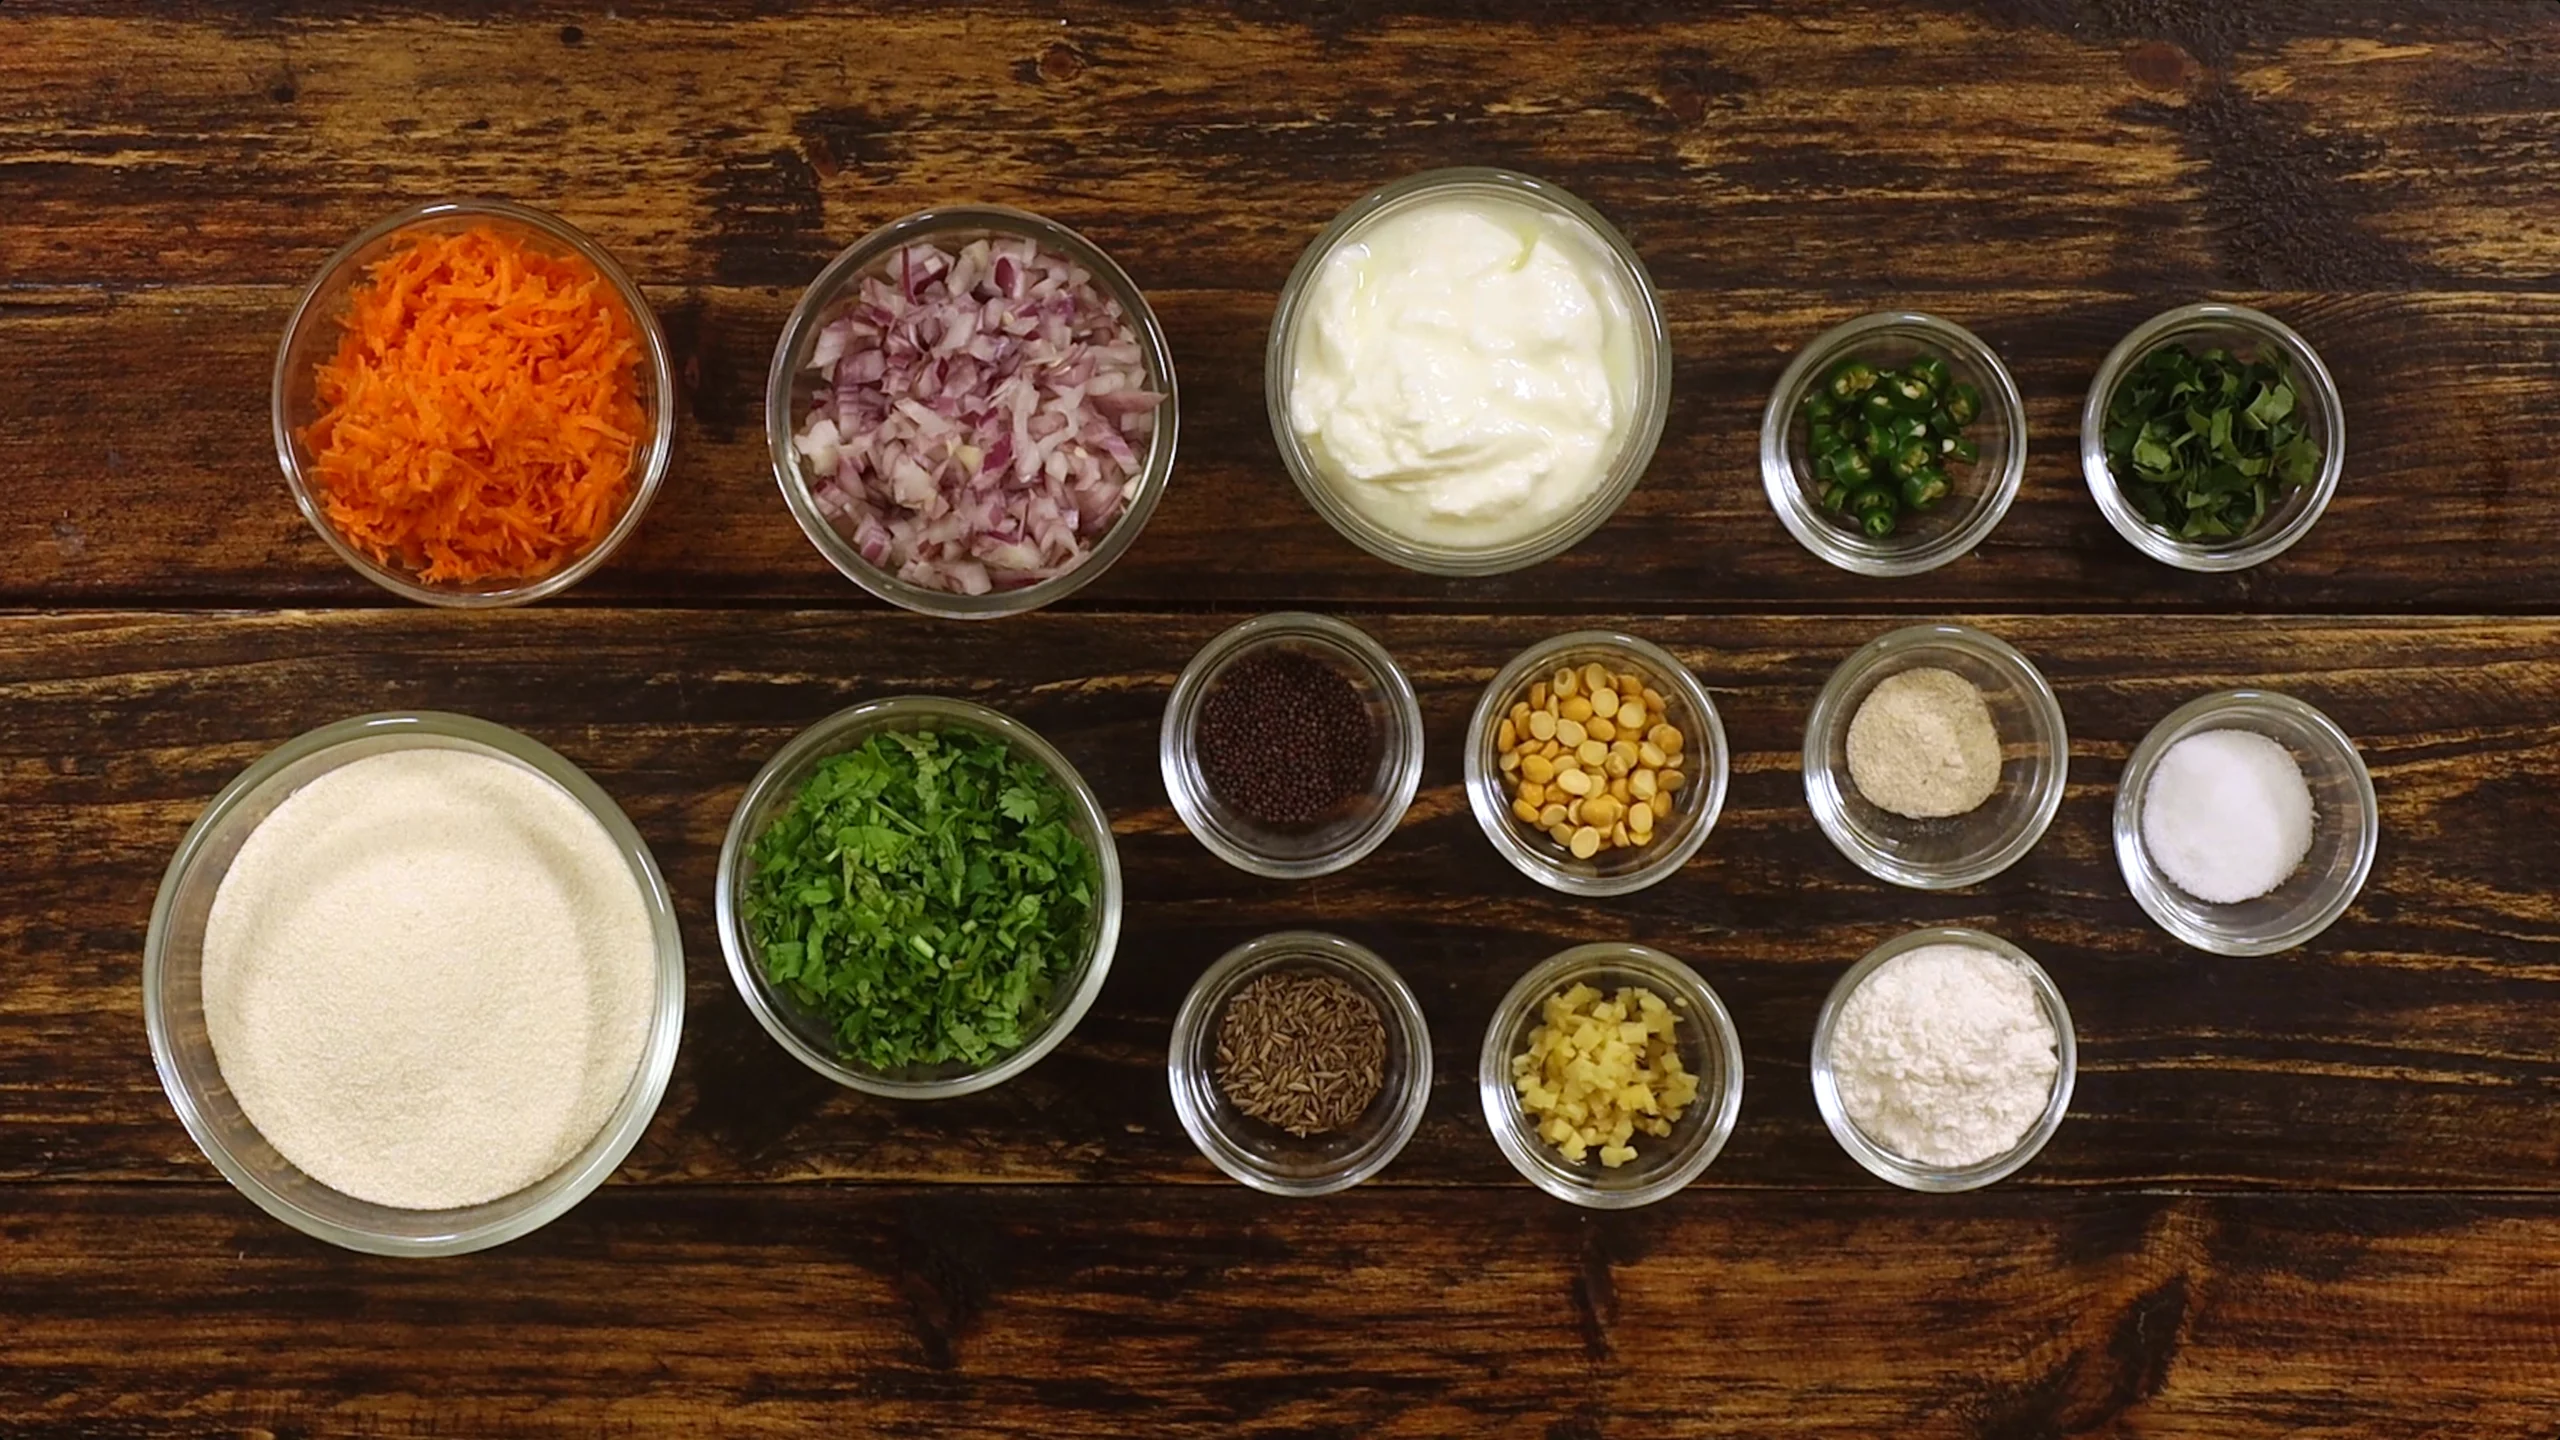
The Ingredients That Make It Sing
- Rava (sooji/semolina)—the star ingredient that gives these their structure and slightly grainy texture.
- Curd adds tang and helps bind everything while keeping the paniyarams moist and tender.
- Grated carrot is optional but adds sweetness, moisture, and those pretty orange flecks.
- Fresh coriander leaves bring a burst of herbaceous freshness.
- Chana dal adds nutty crunch in the tempering.
- Mustard seeds and cumin seeds are your tempering essentials—they pop and crackle and infuse everything with their distinctive flavors.
- Onion gives sweetness and texture once it softens.
- Fresh ginger adds that warm, spicy kick.
- Green chilies bring the heat—adjust according to your tolerance.
- Curry leaves are non-negotiable for that authentic South Indian aroma.
- Hing (asafoetida) adds that mysterious umami depth.
- Rice flour acts as a binding agent and helps create that crispy exterior.
- Water brings the batter to the right consistency, and oil is what gives you that golden, crispy crust.
How It All Comes Together
Let’s start with the prep work. In a large bowl, combine your rava, curd, grated carrot if you’re using it, chopped coriander leaves, and salt. Add water gradually—don’t dump it all in at once—stirring as you go until you get a smooth batter that’s about the consistency of thick pancake batter. Set this aside to let the rava absorb the moisture. Meanwhile, finely chop your onion, ginger, green chilies, and curry leaves. Keep them ready because once you start tempering, things move fast.
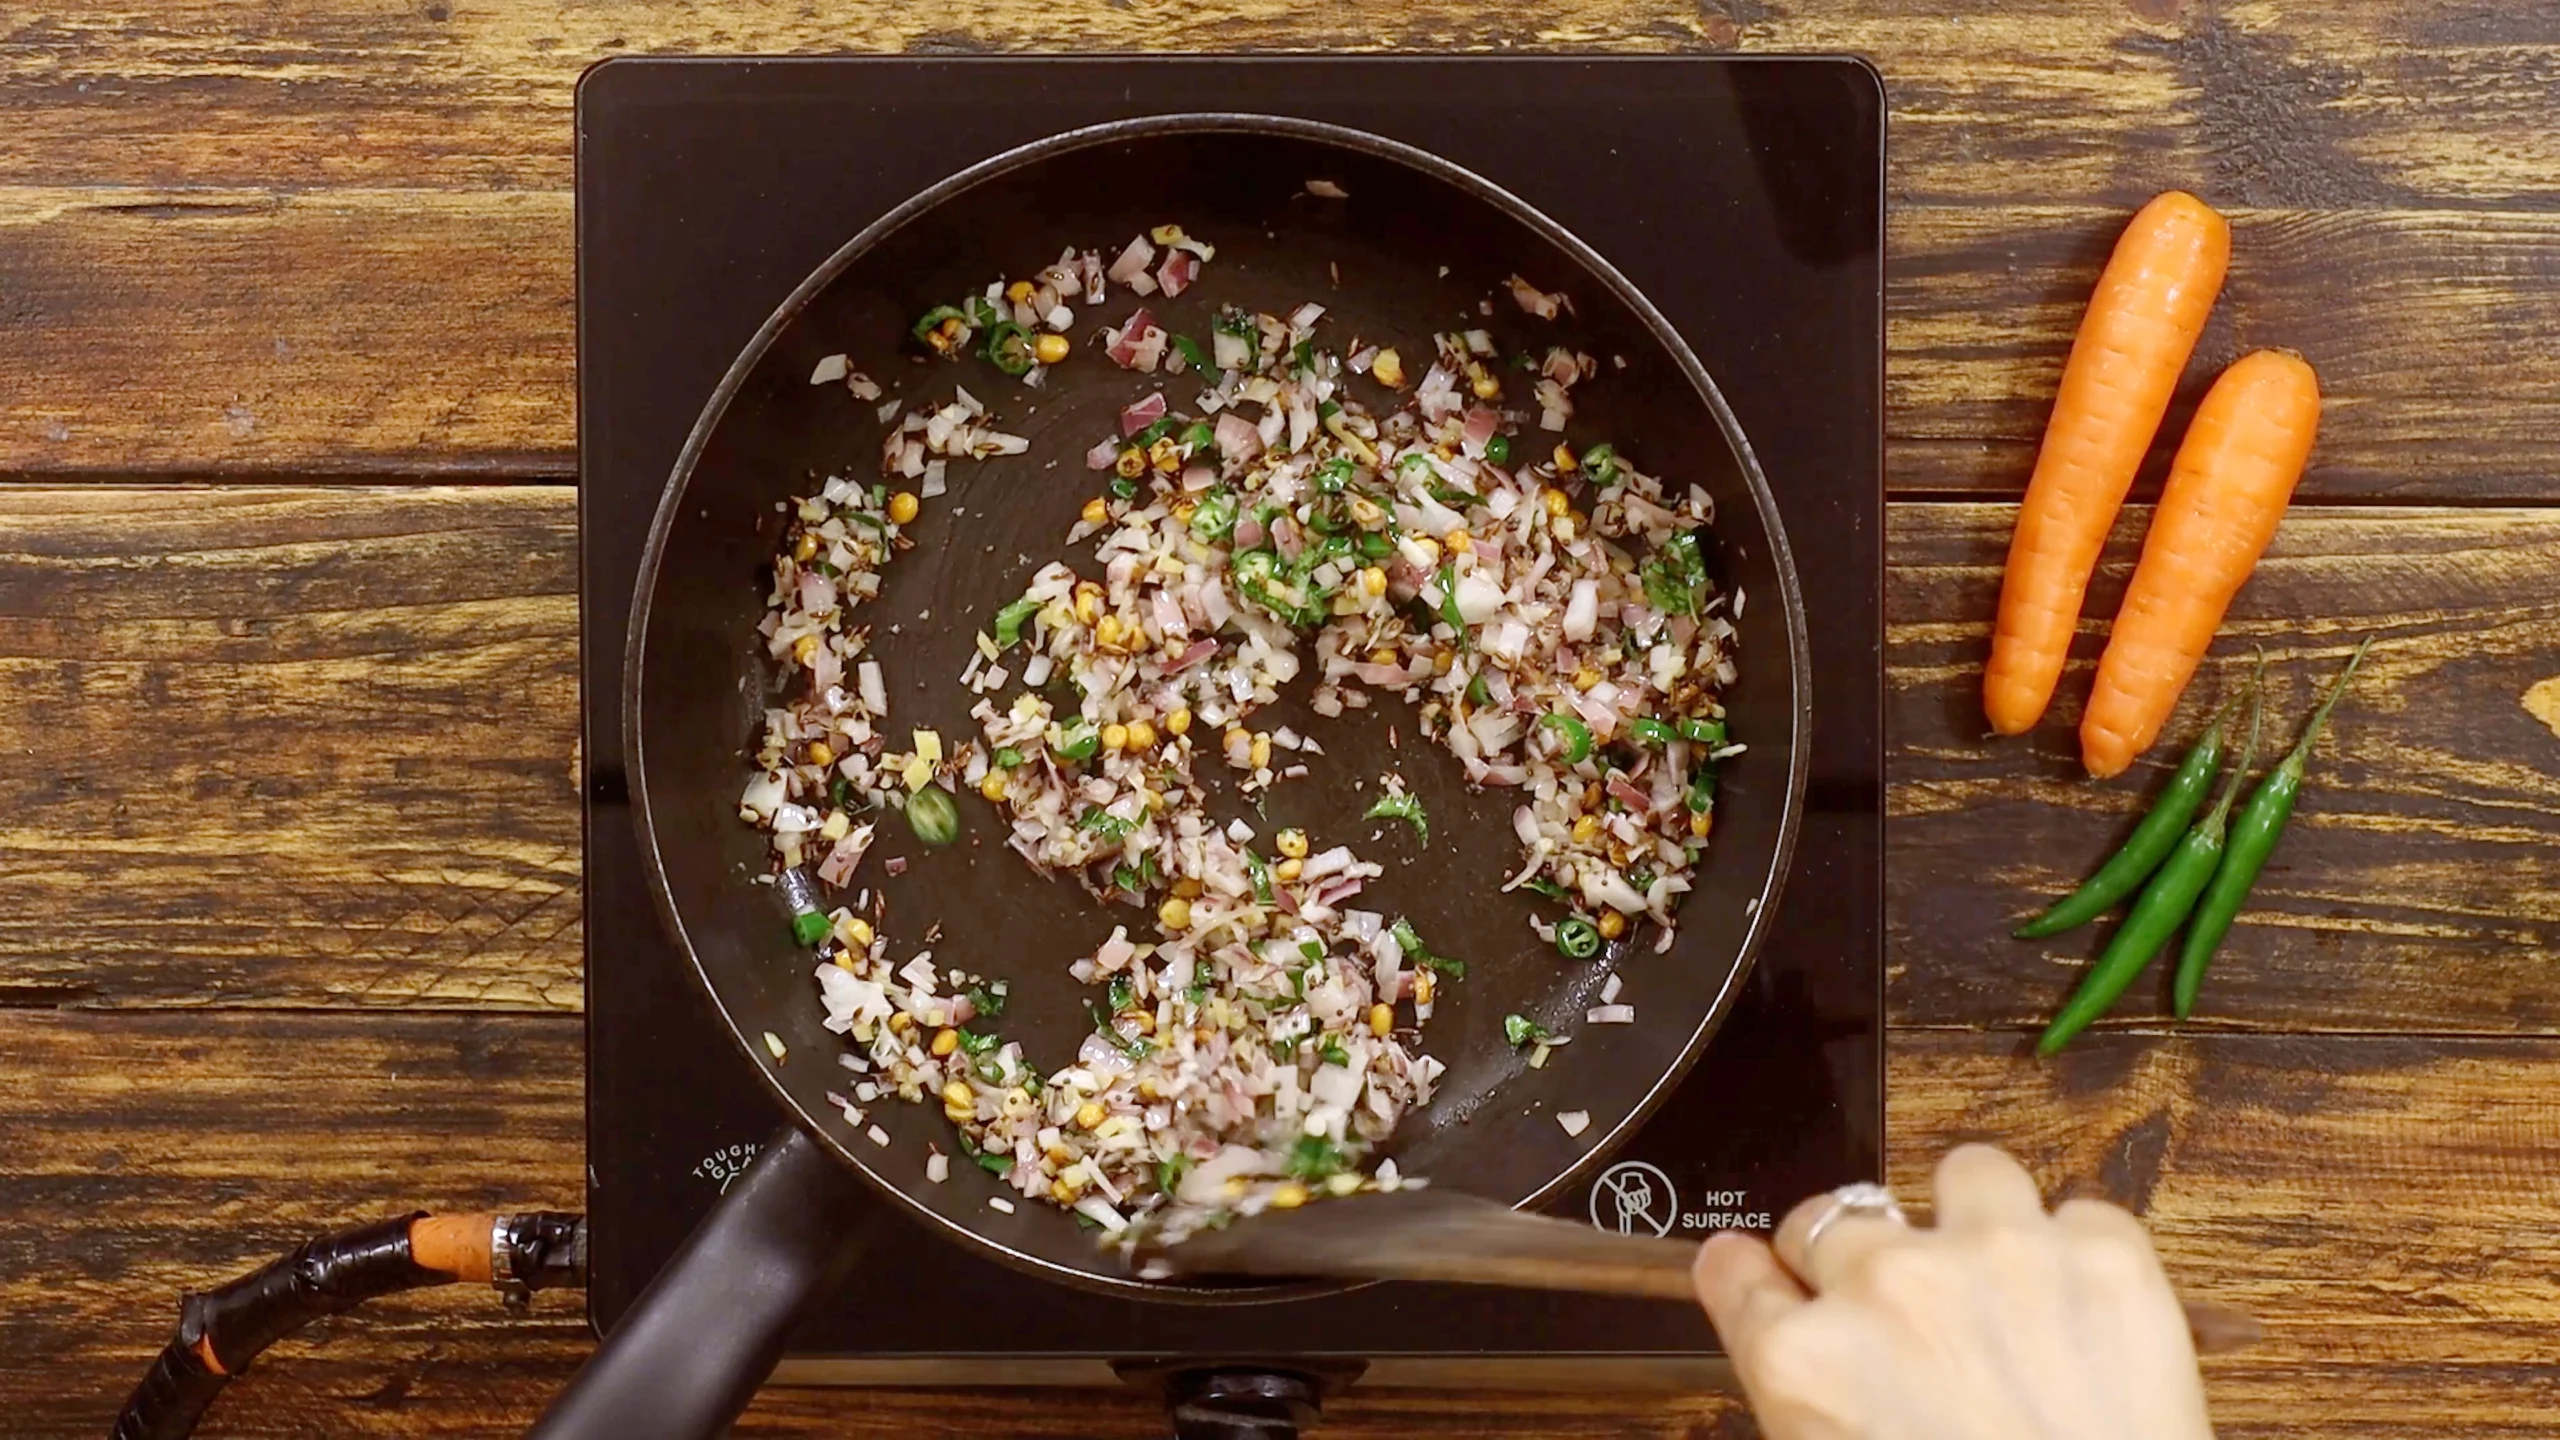
Now for the tempering, which is where all the magic happens. Heat oil in a pan and add your chana dal first—let it turn golden and crispy. Then throw in the mustard seeds and cumin seeds. Listen for that satisfying splutter and pop. Once the mustard seeds start dancing, add your chopped onions, ginger, green chilies, curry leaves, and a pinch of hing. Sauté this mixture for 2-3 minutes until the onions turn translucent and everything smells absolutely incredible. Don’t rush this part—you’re building flavor.
Pour this entire tempered mixture—oil and all—into your rava batter. Mix everything together really well, making sure those spices and aromatics are distributed evenly throughout. Now here’s the important part: let this batter rest for 30 minutes. This resting time allows the rava to absorb the liquids and swell up, which is crucial for getting the right texture. The batter will thicken considerably as it sits. Taste it now and adjust the salt if needed—remember, this is your last chance to fix the seasoning.
💡 Pro Tip: The resting time is crucial. If you skip it or cut it short, your paniyarams will be dense and gritty instead of soft and fluffy. Use this time to make your chutney or set the table.
After the batter has rested, add your rice flour and mix it in. This helps bind everything together and creates that lovely crispy exterior when cooking. Check the consistency—it should be thick enough to hold its shape when dropped from a spoon but still flow slowly. If it’s too thick, add a tablespoon of water at a time until you get it right.
Now let’s cook these beauties. Heat your paniyaram skillet over medium-low heat—and I mean low, because high heat will burn the outside before the inside cooks through. Add about a teaspoon of oil to each cavity and let it heat up until it shimmers. Pour the batter into each mold, filling them about three-quarters full. They’ll puff up as they cook, so don’t overfill or you’ll end up with a connected mass instead of individual spheres.
Let them cook undisturbed on low flame for about 3-4 minutes. You’ll see the edges starting to turn golden and the top surface will look slightly dry and set. Now comes the fun part—use a spoon or a thin skewer to gently flip each paniyaram over. They should release easily if they’re ready; if they stick, give them another minute. Cook the other side for another 2-3 minutes until golden brown all over.
💡 Pro Tip: If you don’t have a paniyaram pan, you can make these in a mini muffin tin in the oven at 180°C (350°F) for about 15-20 minutes, though you’ll lose some of that crispy, oil-fried texture.
What Goes Along
Rava paniyaram pairs beautifully with coconut chutney—the classic choice that never fails. A spicy tomato chutney or tangy tamarind chutney works wonderfully too. Some people love them with just a simple green chutney made with coriander and mint. A side of hot sambhar turns these into a complete meal. And honestly? They’re pretty great on their own with just a hot cup of filter coffee or chai.
How to Serve
Serve these hot, straight from the pan if possible—they’re at their absolute best when the outside is still crackling-crisp and the inside is steaming. Arrange them on a plate with a bowl of chutney on the side for dipping, or drizzle the chutney over the top. They’re finger food, really—no cutlery needed, just pop them in your mouth or tear them in half to scoop up chutney.
How to Store
Store any leftover paniyarams in an airtight container in the fridge for up to 2 days. They’ll lose their crispiness, but they’re still tasty. The batter can be refrigerated for a day—just give it a good stir before using and adjust the consistency if needed, as it will thicken in the fridge.
How to Reheat
To bring back that crispiness, reheat paniyarams in a hot oven at 180°C (350°F) for about 5-7 minutes, or in an air fryer at the same temperature for 3-4 minutes. You can also reheat them in a pan with a tiny bit of oil, rolling them around until they’re warm and crispy again. Microwave works in a pinch, but they’ll be soft rather than crispy.
Common Substitutions
No curd? Use buttermilk or even a mixture of yogurt and water.
Out of rava? You can use a combination of rice flour and gram flour, though the texture will be different.
Can’t find a paniyaram pan? Use a mini muffin tin or an æbleskiver pan.
No rice flour? Cornstarch or all-purpose flour can work as a binding agent, though rice flour gives the best results.
If you want to skip the carrot, add some finely chopped bell peppers or grated zucchini for moisture and texture.
🌿 Vegan Swap: Replace the curd with plant-based yogurt (coconut yogurt works great) or use a mixture of lemon juice and water to get that tangy flavor. Everything else in this recipe is already plant-based, so it’s an easy swap.
Packing for a Party / Bulk Preparation
This recipe scales up beautifully for parties. Mix up a large batch of batter, let it rest, and then cook paniyarams assembly-line style. They can be kept warm in an oven on low heat or reheated just before serving. For meal prep, you can make the batter the night before and store it in the fridge—just bring it to room temperature and adjust consistency before cooking. These also freeze surprisingly well. Freeze cooked paniyarams in a single layer, then transfer to a freezer bag. Reheat directly from frozen in an oven or air fryer. Perfect for those mornings when you want a hot breakfast but have zero time to cook.
Other Related Recipes You Might Like:-
- Healthy Bihari Sattu Paratha Recipe — wholesome, protein-rich Bihari paratha.
- Chai 3 Ways — three flavorful chai variations to enjoy any time.
- Mango Frooti — refreshing, mango-forward drink perfect for summer.
- Chammanthi Coconut Side Dish — aromatic coconut chutney for South Indian meals.
- Banana Ada — sweet, steamed banana-filled delicacy.
- Vegetable Au Gratin — cheesy, baked vegetable delight.
- Chilli Bread — spicy, buttery bread perfect as a snack.
Instant Rava Paniyaram
Description
These Instant Rava Paniyarams are soft on the inside, crispy on the outside, and packed with flavor from a tempering of spices, onions, and herbs. Made with rava (sooji) and curd, this no-fermentation recipe is perfect for busy mornings or evening snack cravings. Quick to make and loved by all ages—just serve them with your favorite chutney and enjoy a wholesome, comforting South Indian bite!
Ingredients
Instructions
Prep Work
-
Prepare the Batter
In a bowl, mix sooji, curd, grated carrot (optional), chopped coriander, and salt. Add water gradually to achieve a smooth batter consistency. Let it sit.

-
Chop the Vegetables
Finely chop the onion, ginger, green chilies, and curry leaves for tempering.
Method
-
Tempering the Spices
Heat oil in a pan. Add chana dal, mustard seeds, and cumin seeds. When mustard seeds splutter, add chopped onion, ginger, green chilies, curry leaves, and hing. Sauté lightly for 2 - 3 minutes.
-
Mix Tempering into Batter
Add the tempered mixture to the rava batter. Mix well and let the batter rest for 30 minutes.check the seasoning and adjust if required.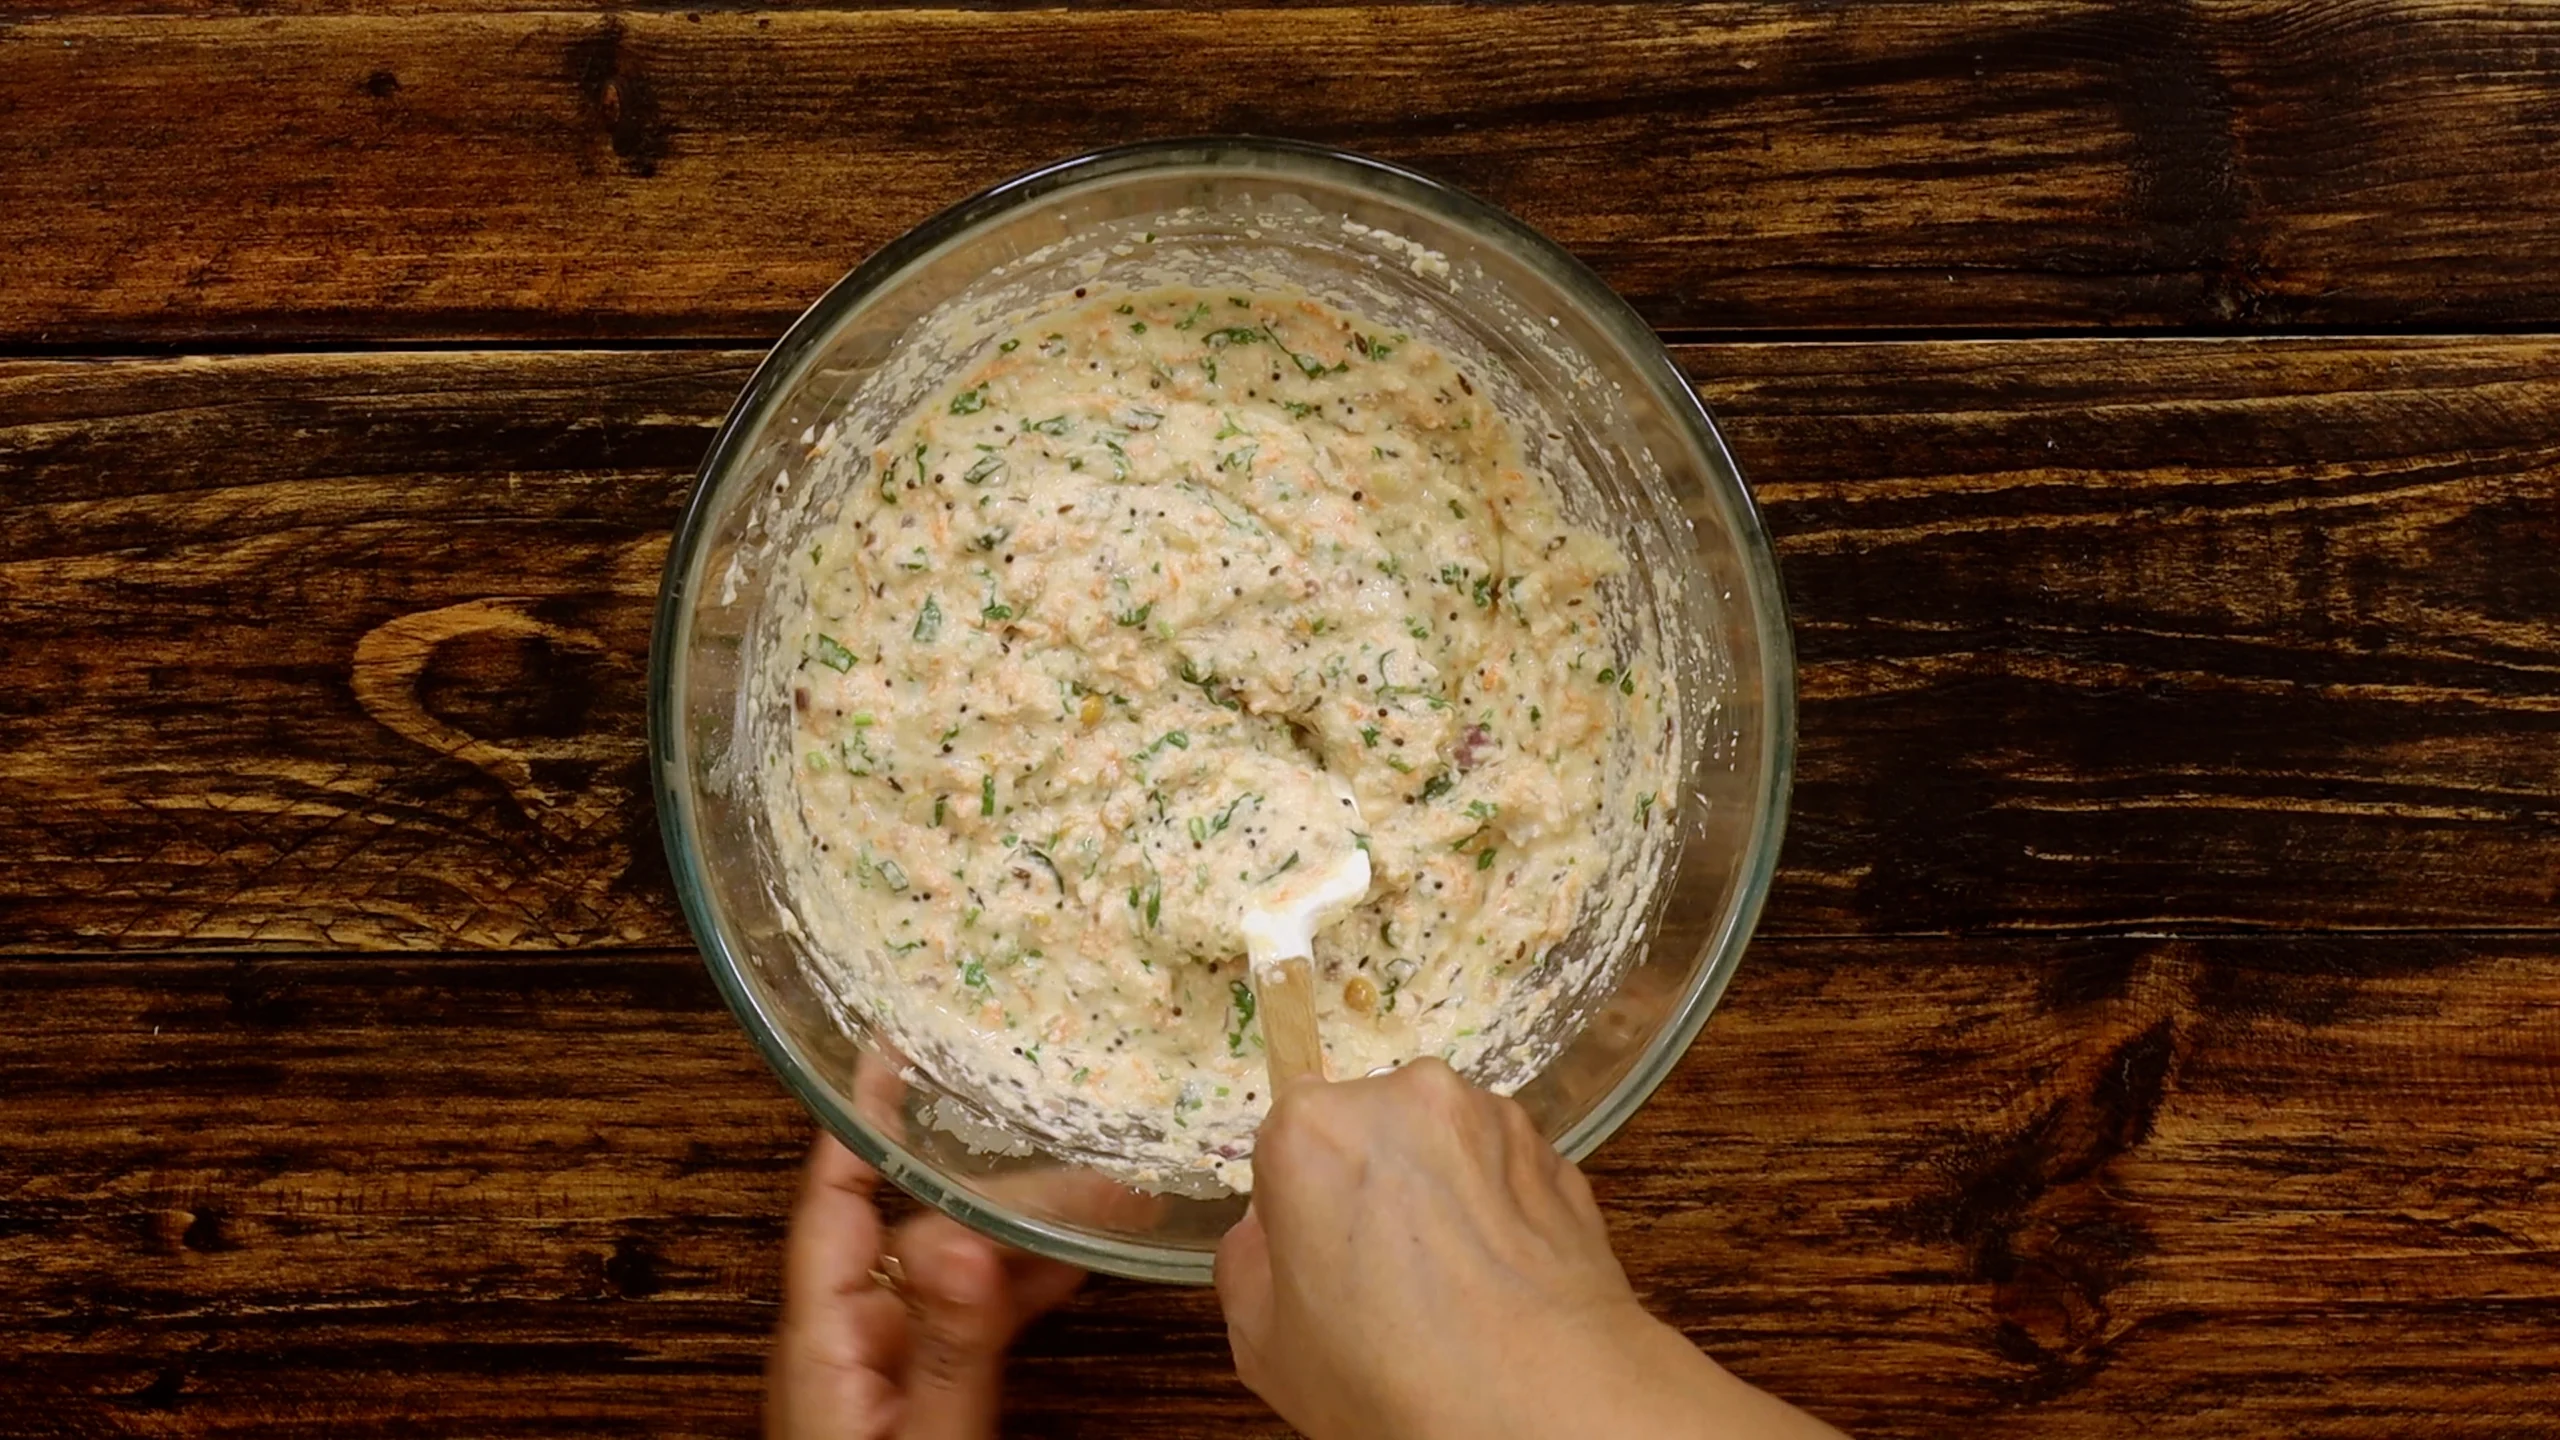
-
Adjusting the Consistency
After resting, add rice flour and mix to make the batter drop-friendly in consistency. -
Cooking the Paniyarams
Heat a paniyaram skillet with oil. Pour the batter into each moldes. Cook on low flame until the bottom turns golden, then flip and cook the other side.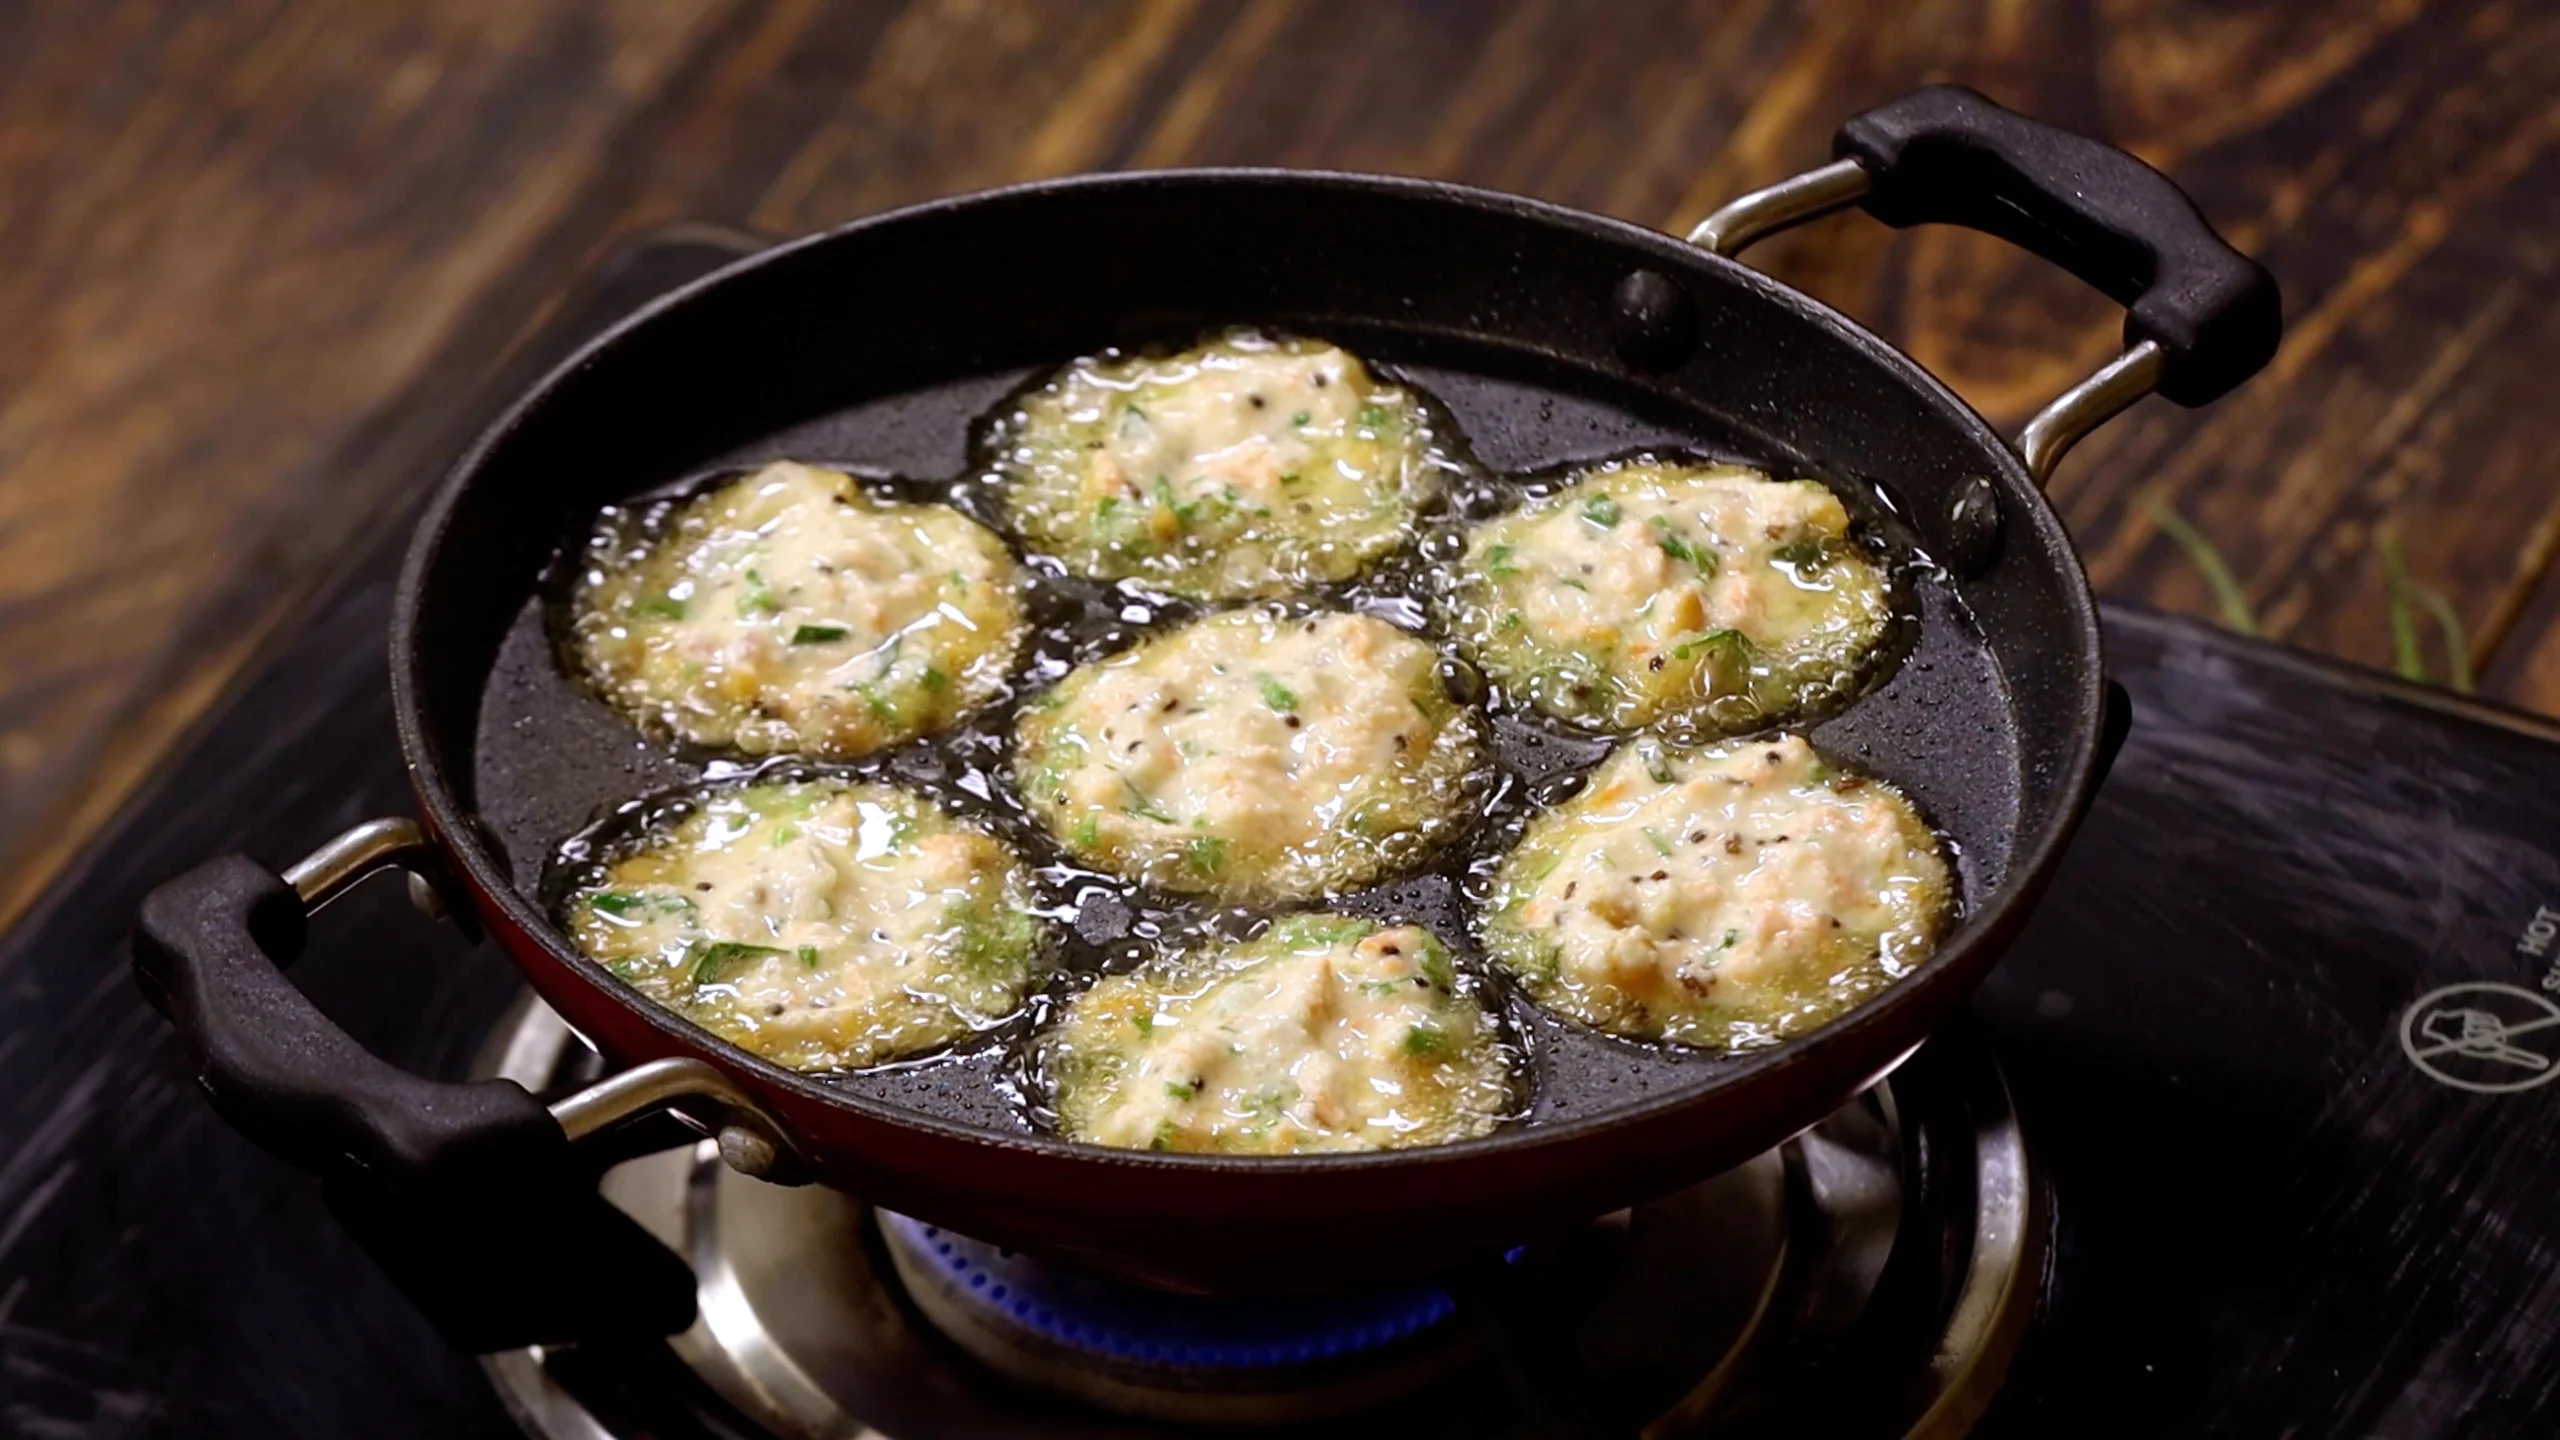
-
Serve and Enjoy
Serve the crispy paniyarams hot with chutney of your choice.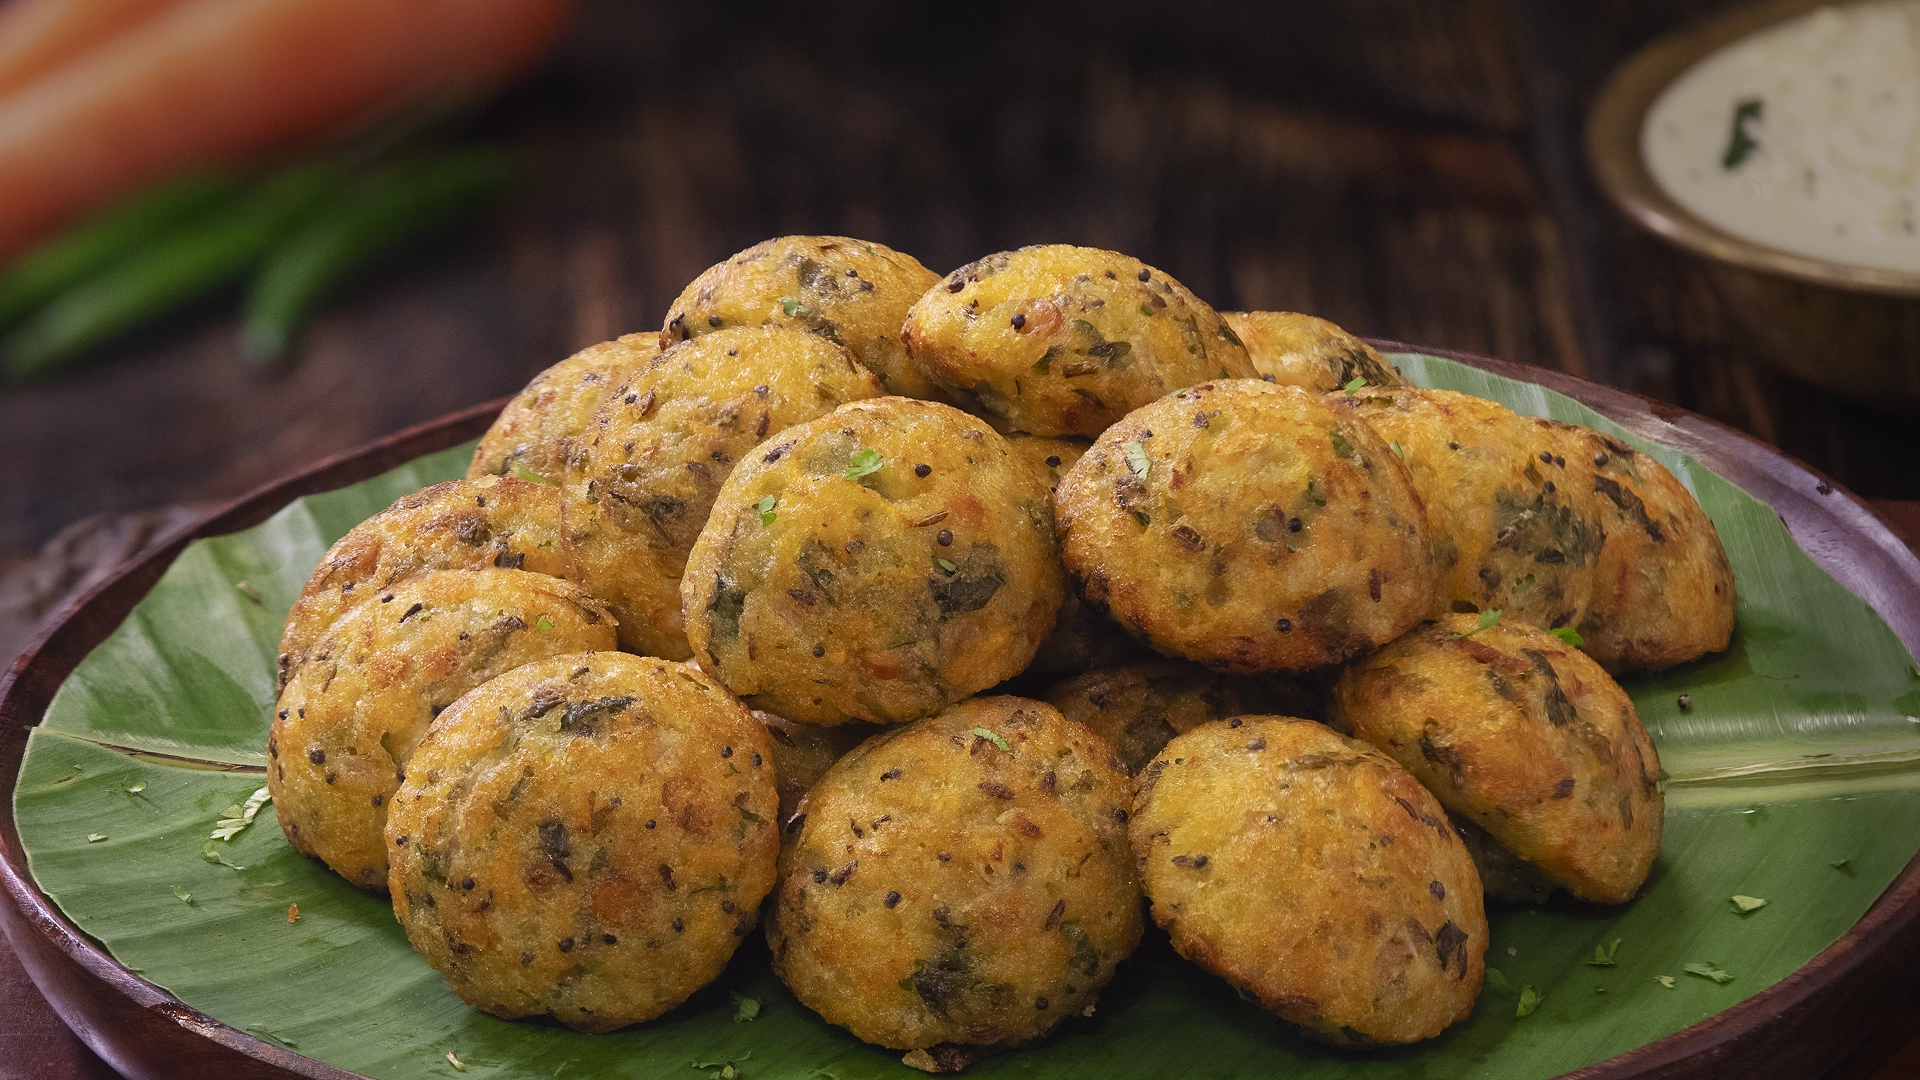
Equipment
 3")

 5")
Affiliate Disclosure: This post contains Amazon affiliate links, i.e., when you buy any product using the links below, we get commissions. but it doesn’t cost you anything extra. If you do purchase any product using the given links, we thank you in advance!
Nutrition Facts
Servings 4
- Amount Per Serving
- Calories 180kcal
- % Daily Value *
- Total Fat 6g10%
- Saturated Fat 1g5%
- Cholesterol 2mg1%
- Sodium 230mg10%
- Potassium 90mg3%
- Total Carbohydrate 28g10%
- Dietary Fiber 2g8%
- Sugars 2g
- Protein 4g8%
- Vitamin A 800 IU
- Vitamin C 5 mg
- Calcium 60 mg
- Iron 1.2 mg
- Magnesium 20 mg
- Zinc 0.5 mg
* Percent Daily Values are based on a 2,000 calorie diet. Your daily value may be higher or lower depending on your calorie needs.

User Reviews
Simply delicious and easy &instant
Very nice and very Delicious yummy yummy recipe
Thank you, Glad you liked it 😊
Absolutely yummy
Thank you, Deepa! Glad you liked it 😊