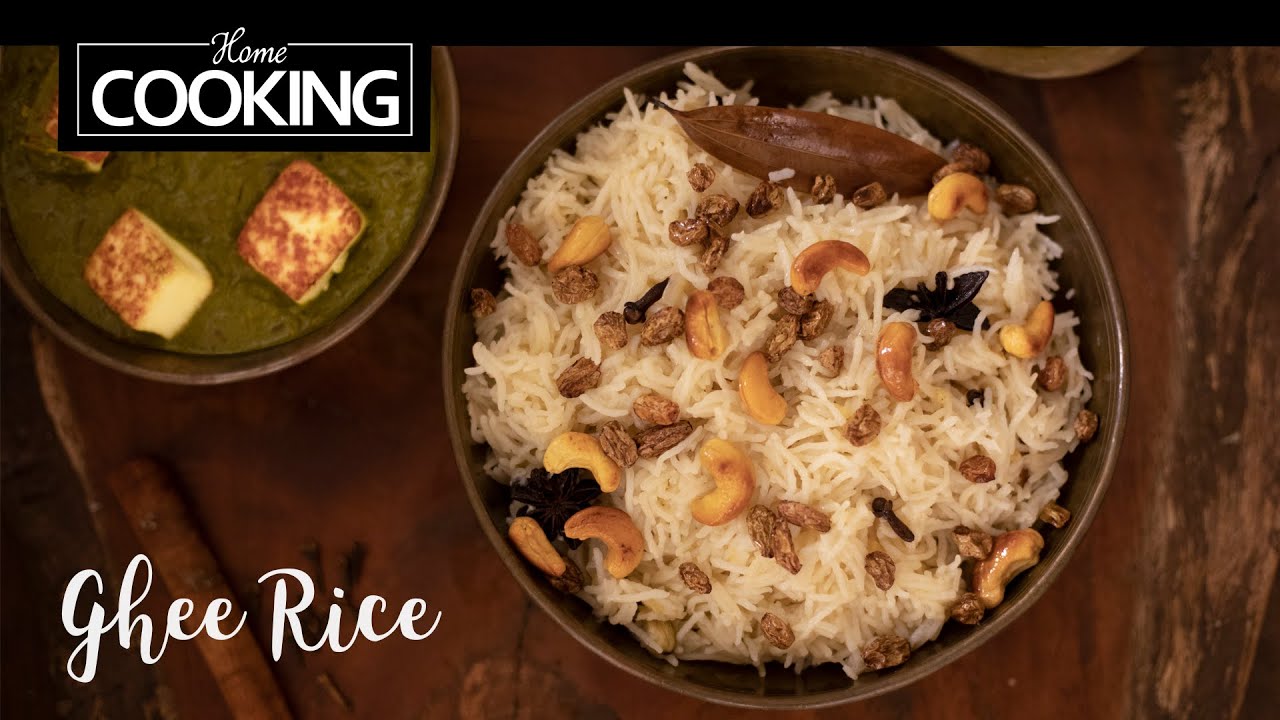
Ever wondered how a simple bowl of rice can smell so royal?
That’s the magic of Ghee Rice.
One spoon of hot rice infused with ghee, whole spices, and caramelised onions… and suddenly your everyday lunch feels festive.
Whether you call it Ghee Bhat, Neychoru, or simply Ghee Pulao, this aromatic rice recipe is one of the easiest ways to upgrade your meal, with minimal ingredients and maximum flavor.
And yes… it’s perfect for lunchboxes too.
What is Ghee Rice (Neychoru)?
Ghee Rice is a mildly spiced, fragrant rice dish popular across South India, especially in Kerala (where it’s known as Neychoru) and Karnataka (Ghee Bhat).
Unlike heavy biryanis, this is light and subtle. The focus is on:
- Pure ghee aroma
- Whole spices
- Soft, fluffy basmati rice
- Sweet notes from onions, cashews, and raisins
It’s simple. But when done right? It tastes luxurious.
Why This Ghee Rice Recipe Works
You don’t always need complicated gravies.
Sometimes you just need:
- Perfectly cooked long-grain rice
- Balanced whole spices
- Golden sautéed onions
- The richness of ghee
This recipe gives you:
- Fluffy, separate grains
- Aromatic depth
- Light spice
- Kid-friendly taste
It’s ideal for:
- Quick lunch recipes
- Lunchbox ideas
- Pairing with kurma or chicken curry
- Festive meals
Ingredient Breakdown
- Ghee: The hero. It carries all the spice flavors and gives richness.
- Basmati Rice: Long-grain rice ensures fluffiness and fragrance.
Whole Spices
- Cinnamon – warmth
- Star anise – subtle sweetness
- Cardamom – aroma
- Cloves – sharp depth
- Bay leaf – earthy note
- Mace – floral spice touch
These spices create that signature pulao fragrance.
- Onion: Adds sweetness and slight caramelization.
- Ginger & Garlic: Balances the richness of ghee.
- Green Chilli: Mild heat without overpowering.
- Cashews & Raisins: Adds texture and a sweet crunch contrast.
How It Comes Together
Start by washing and soaking your basmati rice for 30 minutes.
This step is non-negotiable.
🔥 Pro Tip: Soaking helps the grains elongate and cook evenly.
Meanwhile, pound ginger and garlic fresh. Fresh paste makes a noticeable difference.
Now, heat the ghee in a pressure cooker.
Add all whole spices first. Let them crackle gently. You’ll immediately smell the aroma — that’s when you know the base is right.
Add thinly sliced onions and sauté patiently. Don’t rush. They should turn soft and slightly golden.
Add green chillies and sauté briefly.
Now stir in the freshly pounded ginger and garlic. Cook until the raw smell disappears.
Pour in 1¾ cups of water (for 1 cup rice).
Alternative option? Use diluted coconut milk instead of water for a richer Kerala-style neychoru.
Add salt.
Once the water begins to boil, add the soaked and drained rice. Mix gently — only once.
Drizzle ½ teaspoon ghee on top.
Close the cooker and cook for one whistle on medium flame.
Turn off the heat and let pressure release naturally.
Meanwhile, roast cashews and raisins in a little ghee until golden.
Open the cooker gently. Fluff the rice carefully using a fork.
Top with roasted nuts and raisins.
That’s it.
Aromatic, fluffy ghee rice is ready.
What Problems This Recipe Solves
- Quick but impressive lunch
- Kids’ lunchbox boredom
- Last-minute guests
- Light alternative to biryani
- Festive meal side dish
It’s elegant without being complicated.
What Goes Along with Ghee Rice
This is where it shines.
Perfect pairings:
- Vegetable kurma
- Chicken curry
- Egg roast
- Paneer butter masala
- Dal fry
- Raita
For Kerala-style meals, serve with chicken curry and pickle.
How to Serve
Serve hot and fluffy.
Garnish with:
- Extra fried onions
- Fresh coriander
- A drizzle of warm ghee
For guests, serve in a wide bowl to show off the long grains.
Packing Tips
Let rice cool slightly before packing.
Use an insulated container to keep it warm.
Pair with a semi-gravy curry to prevent dryness.
Party / Bulk Preparation Tips
Cooking for 10+ people?
- Use a large heavy-bottomed vessel instead of cooker.
- Maintain rice-to-water ratio.
- Add nuts just before serving to keep crunch intact.
Avoid overmixing, that’s how rice breaks.
Common Pitfalls
Rice Becoming Mushy
Too much water or overcooking.
Rice Sticking to Bottom
Flame too high.
Lack of Aroma
Insufficient ghee or stale whole spices.
Rice Clumping
Not soaking rice properly.
How to Store Ghee Rice
Store in airtight container in refrigerator for up to 2 days.
Do not leave at room temperature for long due to ghee content.
Substitutions
- Replace basmati with jeerakasala rice for authentic neychoru.
- Add mint leaves for extra freshness.
- Add fried onions for richer flavor.
- Replace water with coconut milk for Kerala-style version.
How to Reheat
Sprinkle 1–2 tablespoons water over rice.
Reheat covered on low flame.
Or microwave covered for 1–2 minutes.
Fluff gently before serving.
Other Related Recipes You Might like:-
- Vegetable Dum Biryani – aromatic layered biryani perfect for festive meals.
- Matar Pulao – simple and fragrant peas pulao for everyday lunches.
- Kashmiri Pulao – mildly sweet, nutty rice dish with dry fruits.
- Paneer Butter Masala – rich, creamy paneer curry that pairs beautifully with ghee rice.
- Butter Chicken – classic creamy chicken gravy ideal with fragrant rice.
- Chicken Ghee Roast – bold and spicy chicken for flavour-packed meals.
- Mutton Donne Biryani – Karnataka-style biryani with deep masala flavours.
- Onion Raita / Snake Gourd Raita – cooling raita to balance rich rice dishes.
Ghee Rice
Description
This ghee rice is simple, comforting, and full of a beautiful aroma from whole spices gently sautéed in ghee. Each grain turns out fluffy and separate, with just the right balance of warmth from cinnamon, cardamom, and cloves. The lightly caramelised onions, soft raisins, and crunchy cashews make every bite feel special without adding any extra work.
Made easily in a pressure cooker, this neychoru comes together quickly and fits perfectly into busy weekdays or relaxed weekend lunches. It pairs so well with kurma, chicken curry, or even a simple raita. Once you try this homemade version, you’ll see how effortless it is to turn plain rice into something truly memorable.
Ingredients
Instructions
Prep Work
-
Rinse and soak rice
Wash the basmati rice well until the water runs clear and soak it for 30 minutes
-
Pound ginger and garlic
Crush the ginger and garlic together using a mortar and pestle until coarse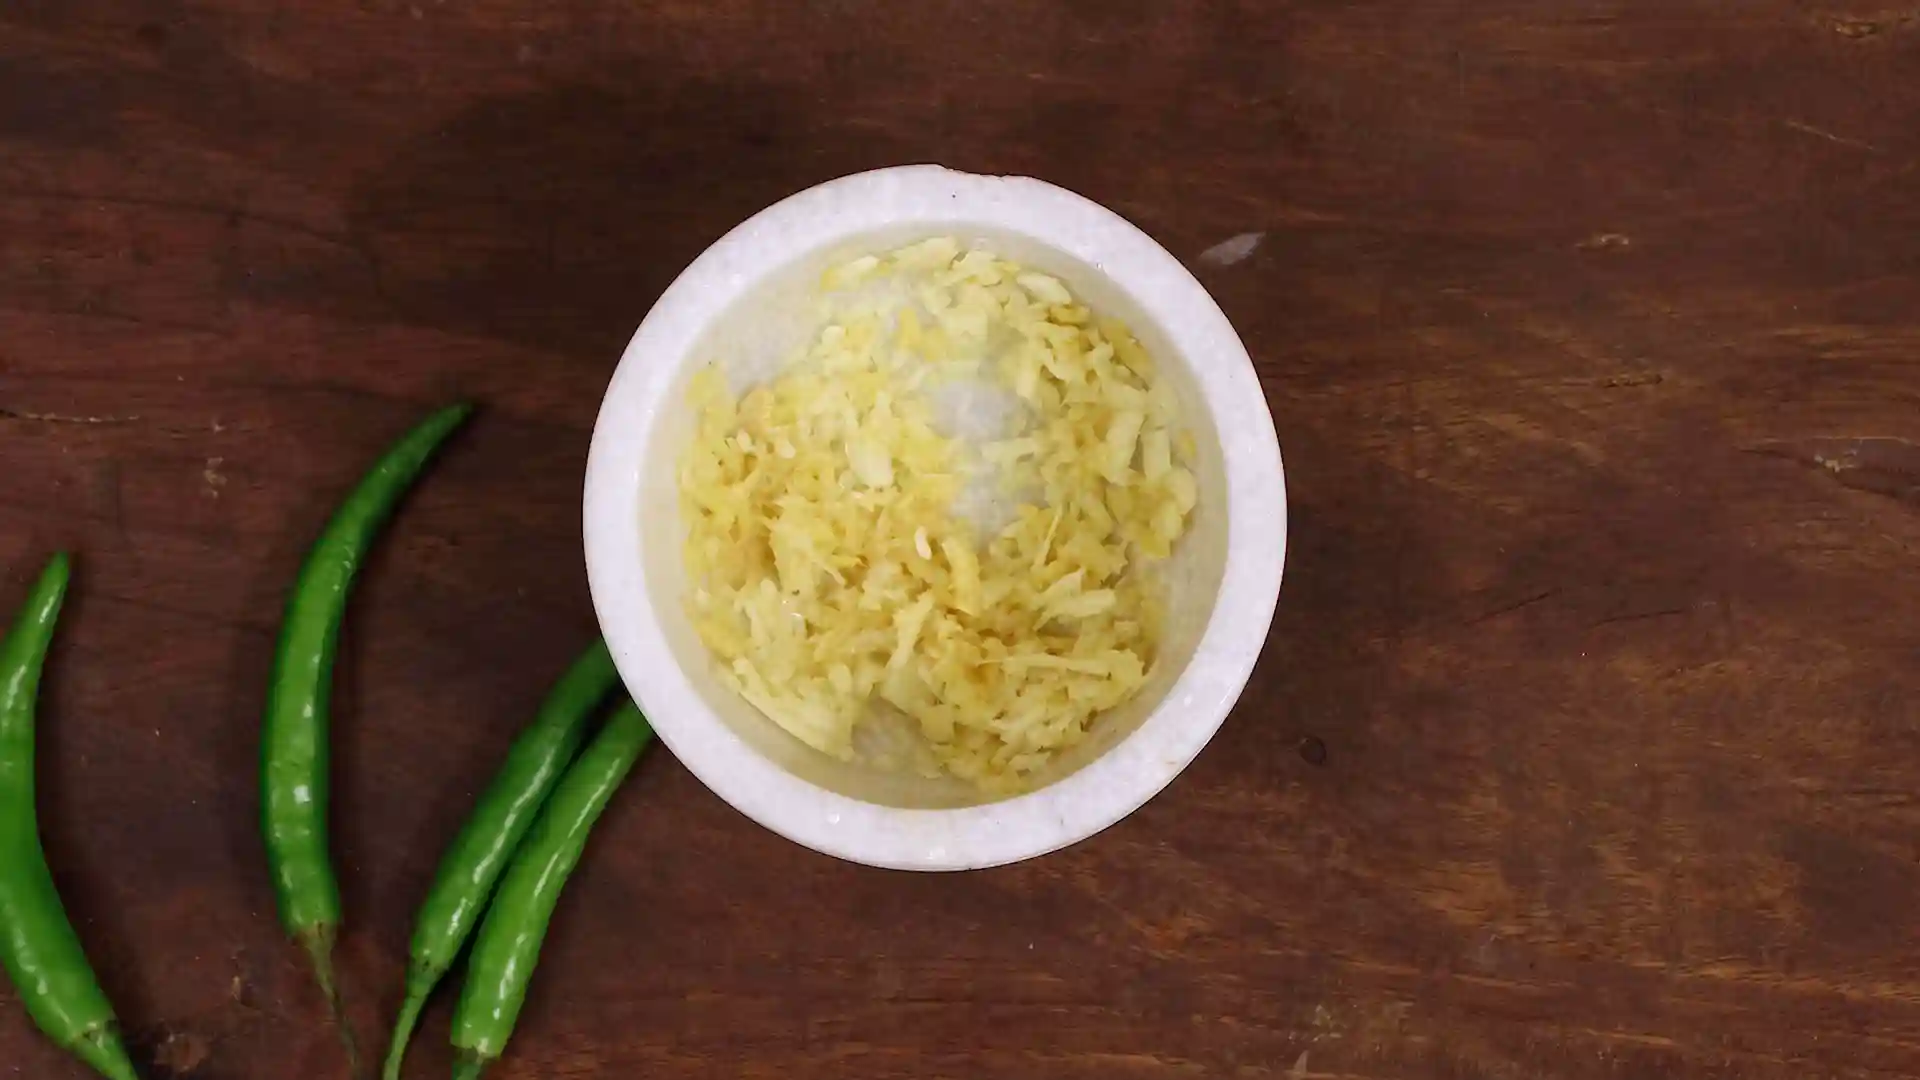
-
Slice onions and slit chillies
Thinly slice the onions and slit the green chillies lengthwise
Method
-
Heat ghee
Add ghee to the pressure cooker and let it melt and heat gently
-
Saute whole spices and onion
Add cinnamon, star anise, cardamom, bay leaf, clove, mace and sliced onion then saute until aromatic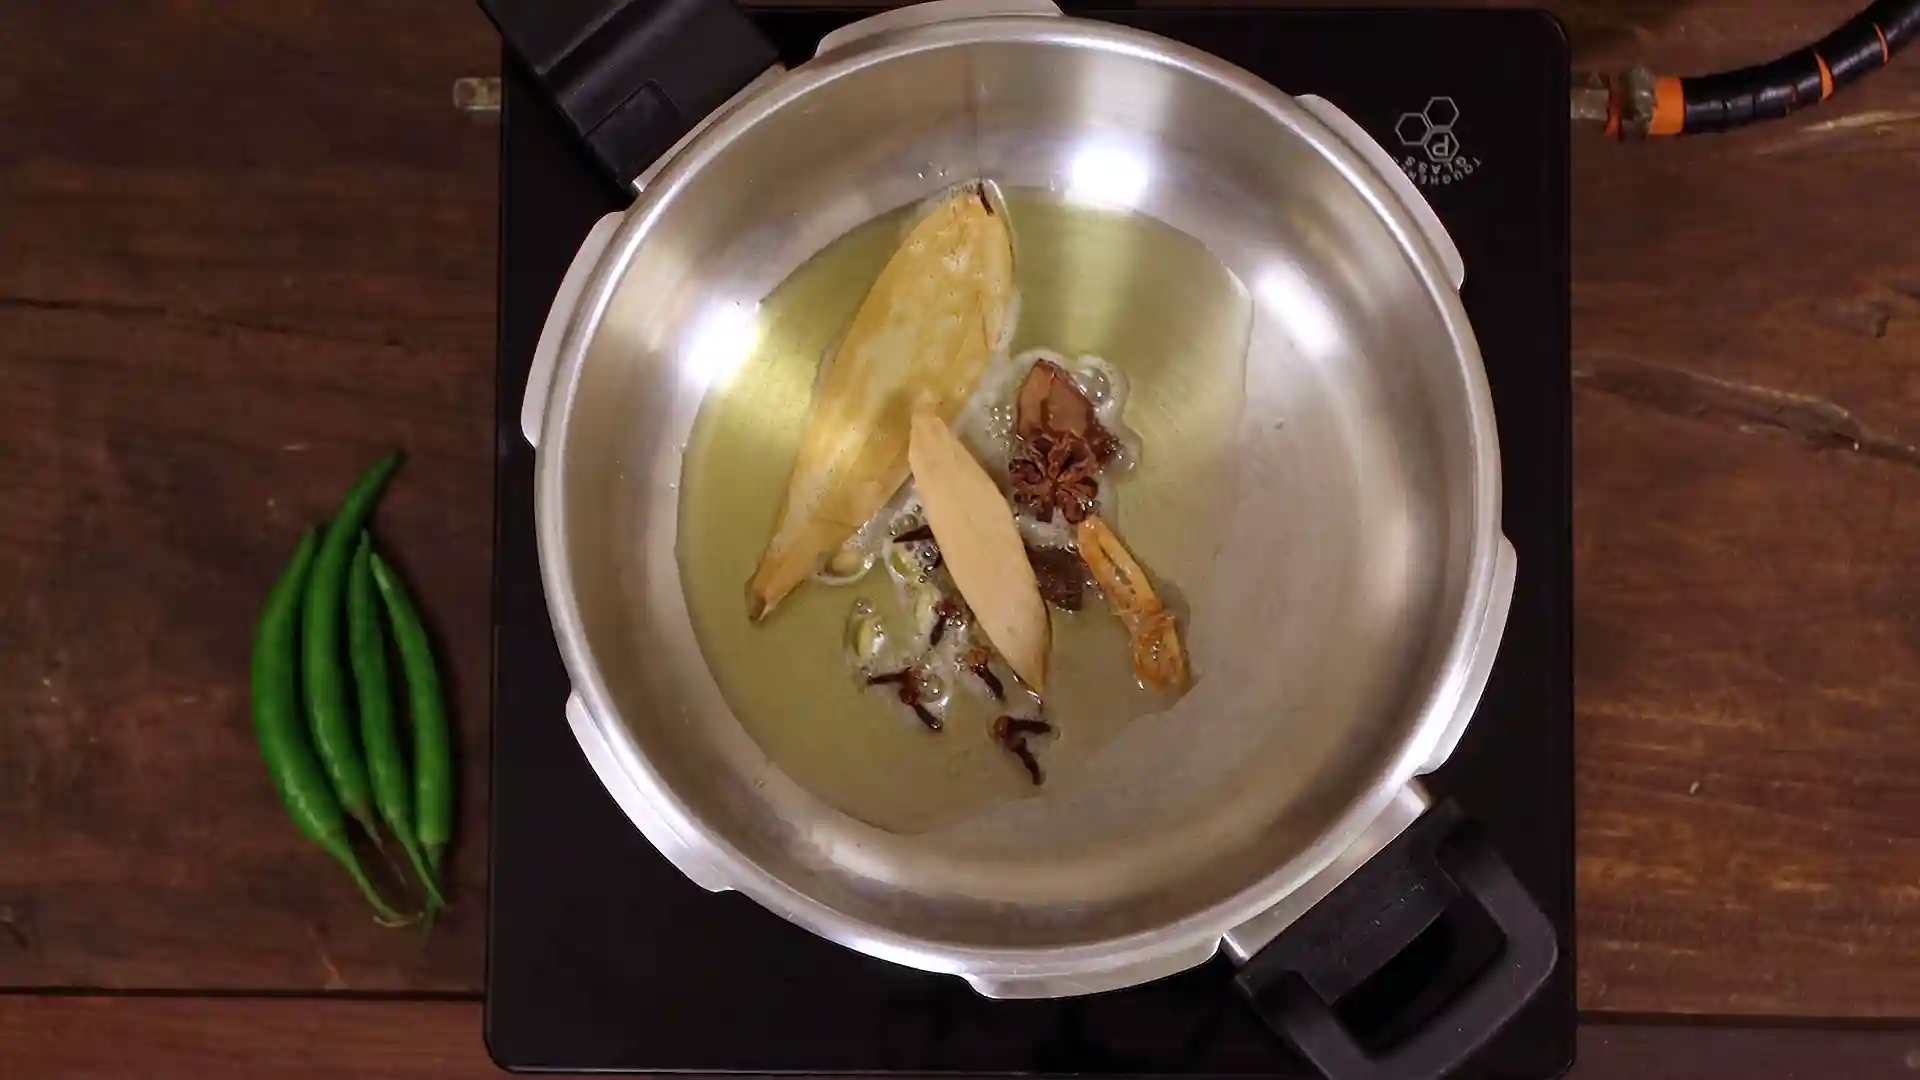
-
Add green chillies
Add slit green chillies and saute until the onion changes color -
Add ginger garlic
Add the freshly pounded ginger and garlic,salt and saute until the raw smell goes away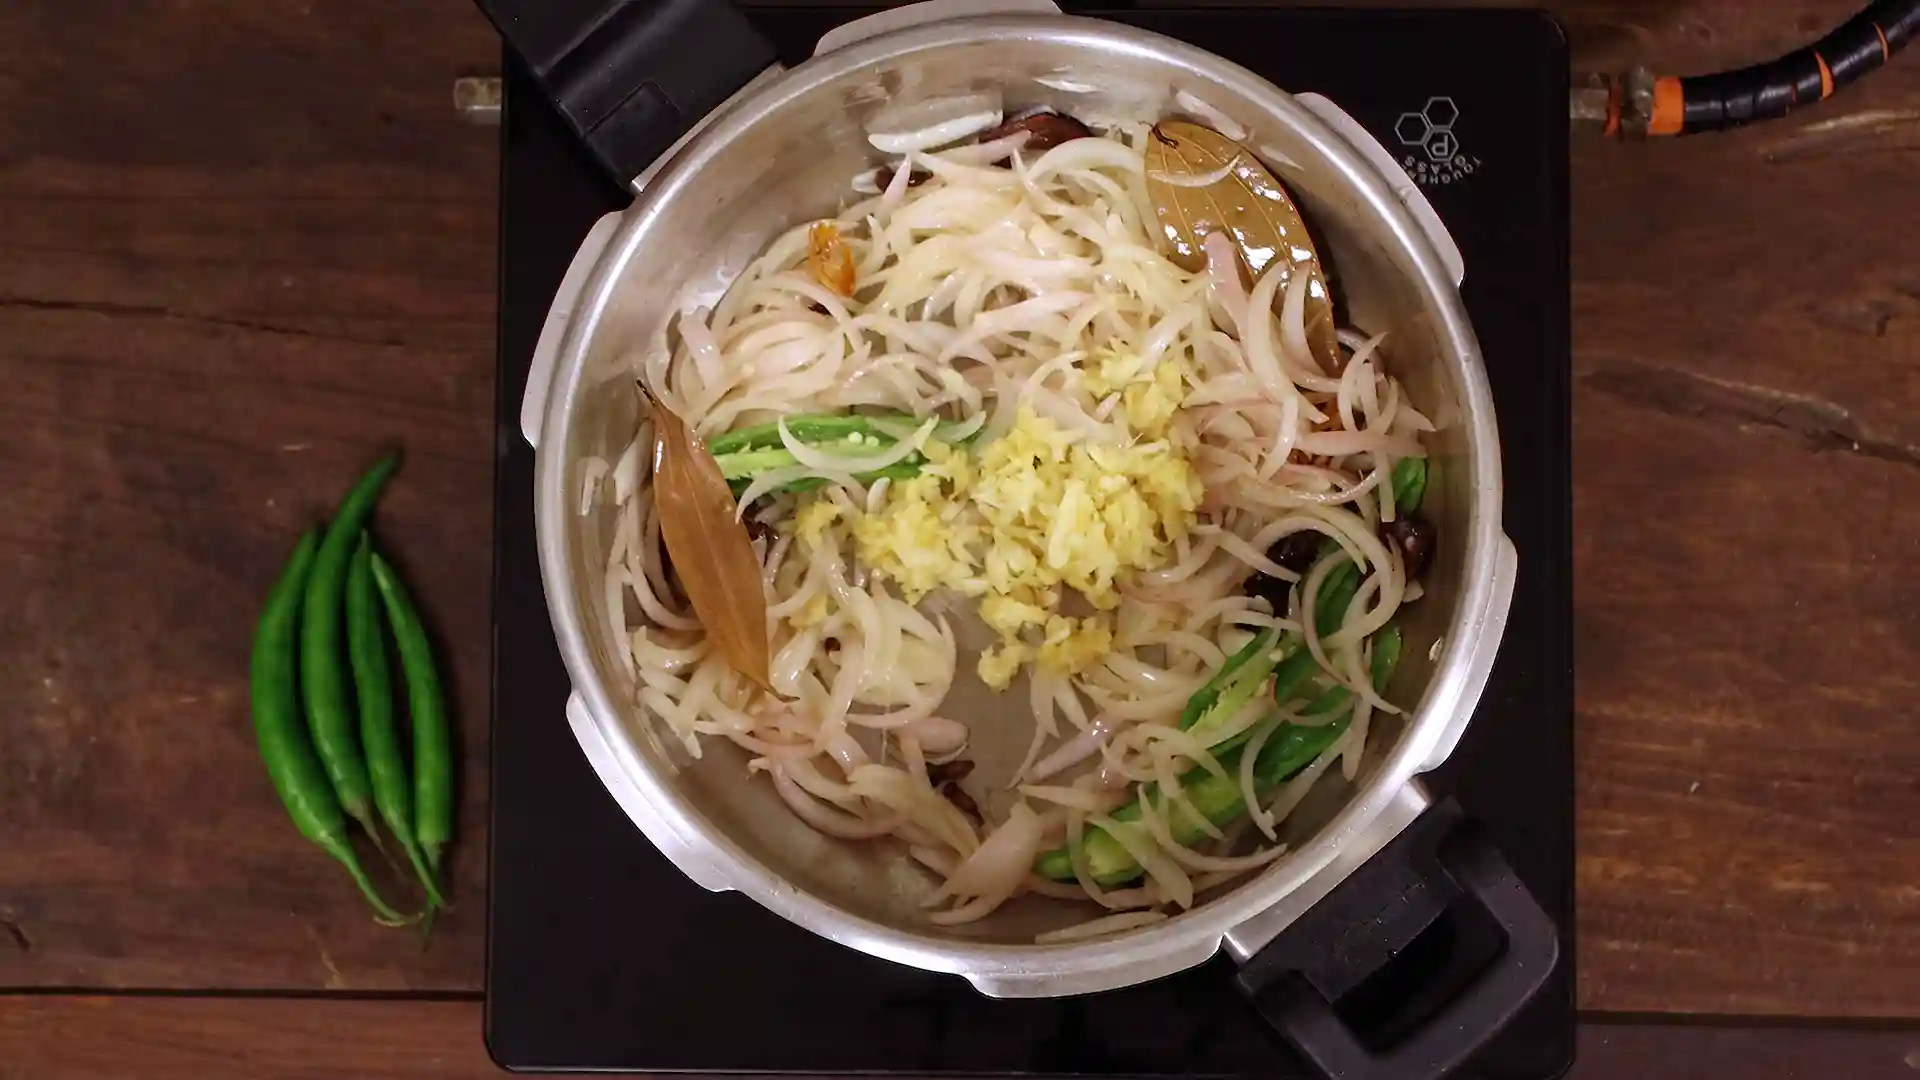
-
Pour water
Pour water into the cooker and bring it to a boil you can use diluted coconut milk instead of water if you like -
Add soaked rice
Drain the soaked rice and add it to the cooker then mix gently once -
Add little ghee
Add a little more ghee on top for extra aroma -
Pressure cook
Once the water starts boiling, close the cooker and let is cook for 1 whistle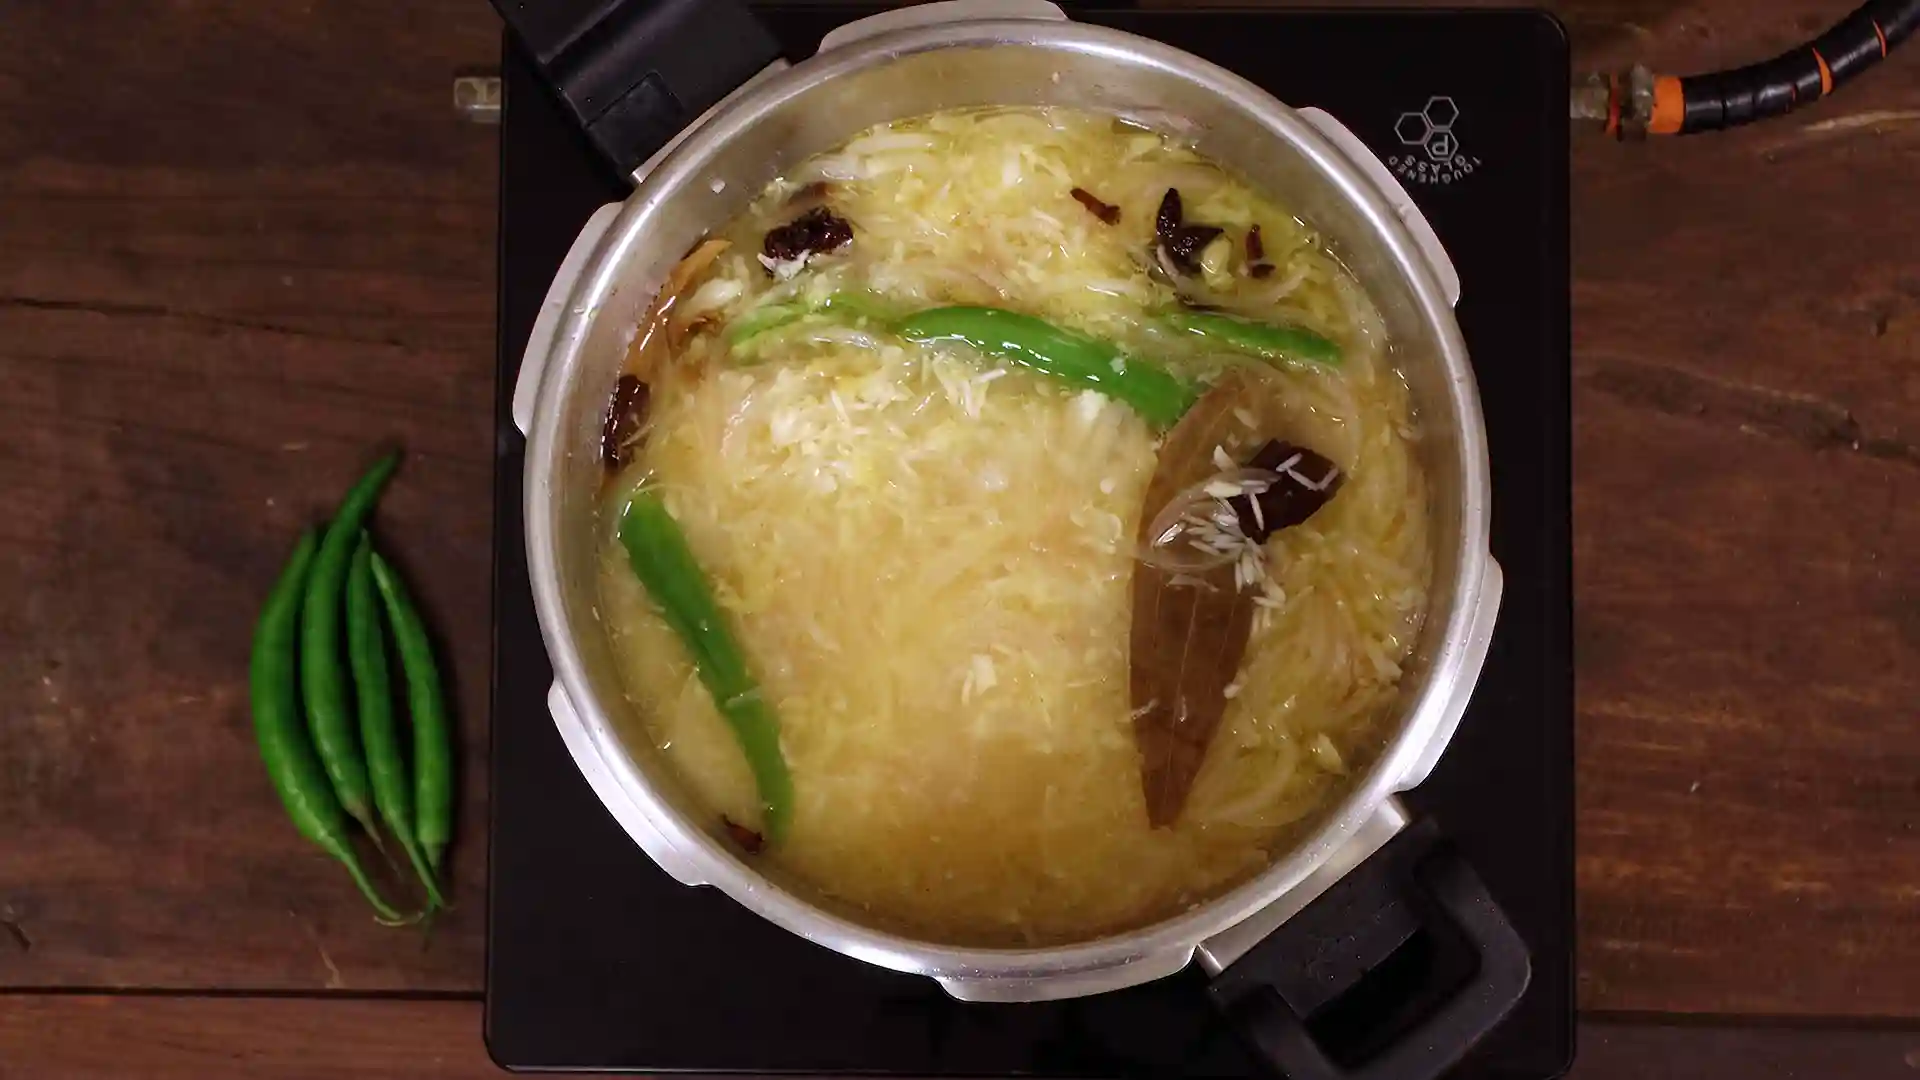
-
Roast nuts and raisins
In a small pan roast cashew nuts and raisins in ghee until golden and plump -
Finish and serve
Once pressure releases open the cooker fluff the rice gently and add roasted nuts and raisins on top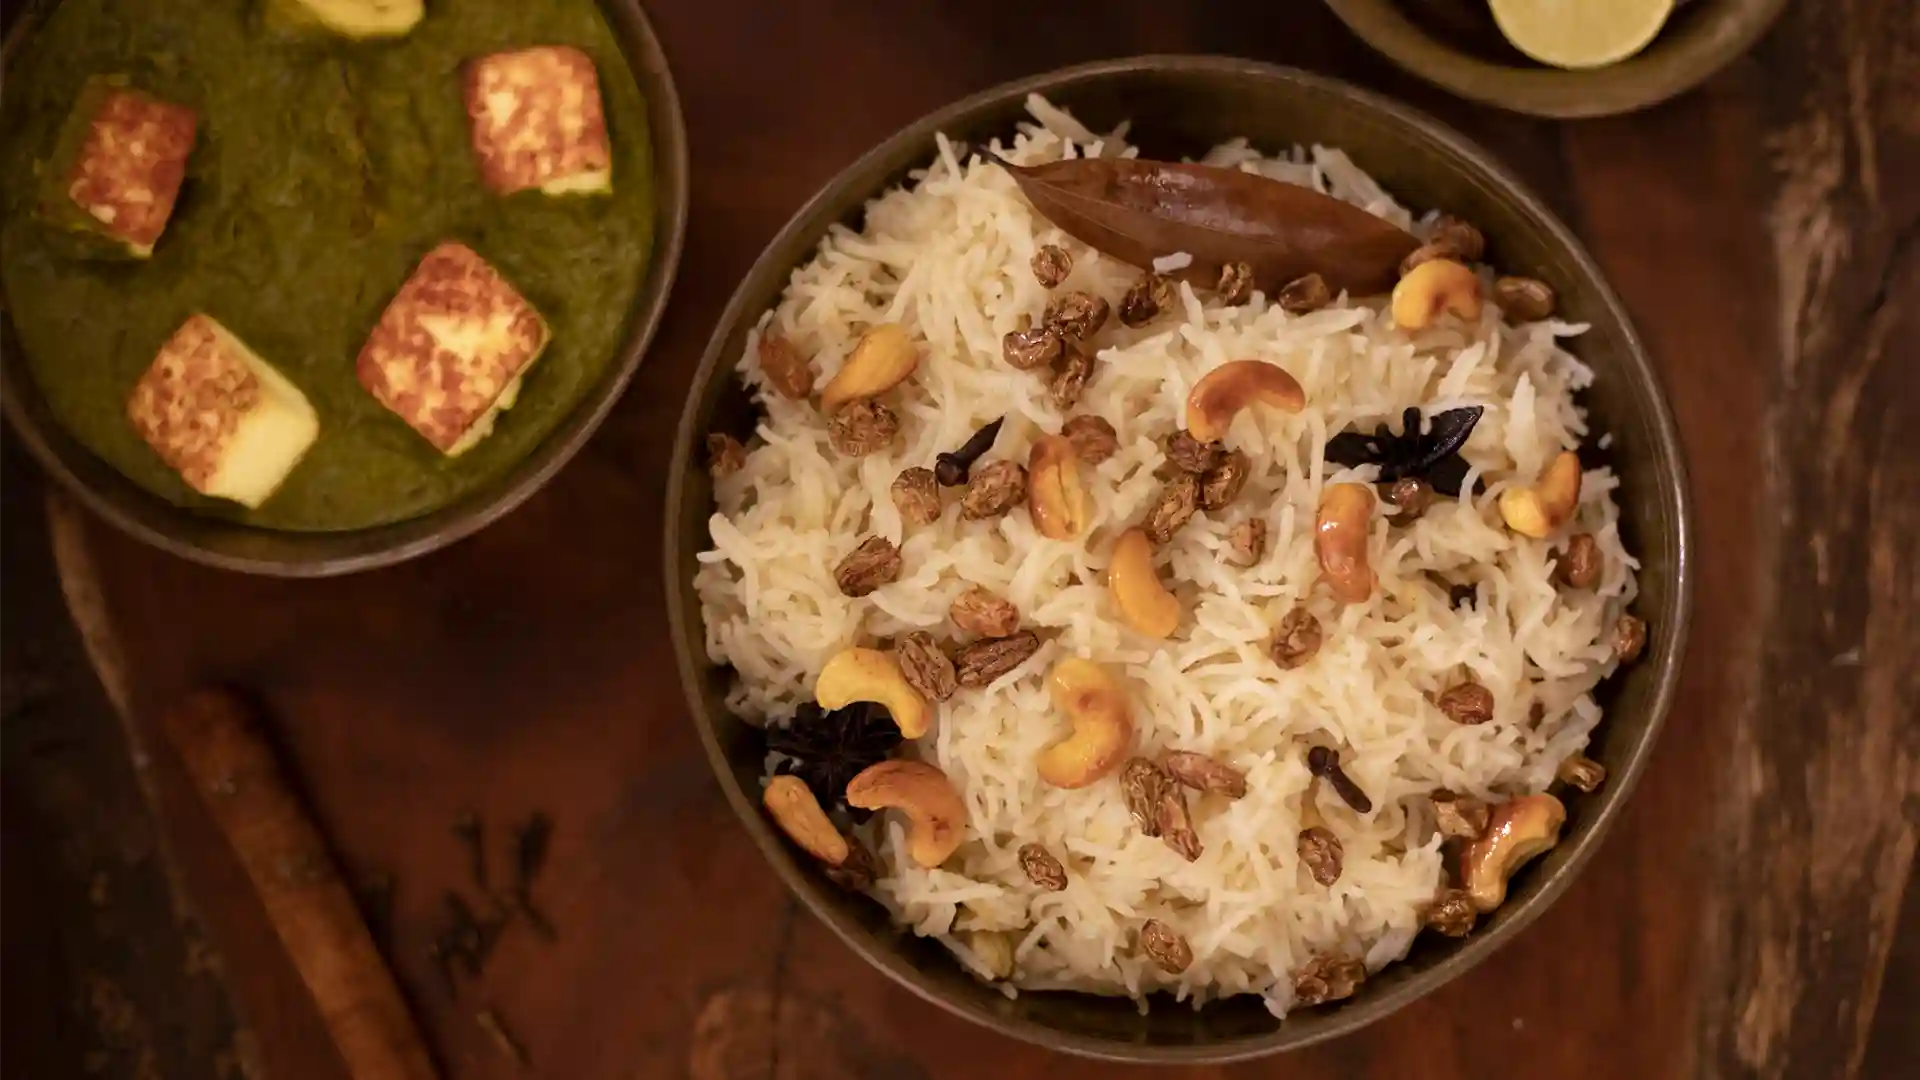
Equipment
 3")

 5")
Affiliate Disclosure: This post contains Amazon affiliate links, i.e., when you buy any product using the links below, we get commissions. but it doesn’t cost you anything extra. If you do purchase any product using the given links, we thank you in advance!
Nutrition Facts
Servings 3
- Amount Per Serving
- Calories 320kcal
- % Daily Value *
- Total Fat 12g19%
- Saturated Fat 7g35%
- Cholesterol 25mg9%
- Sodium 320mg14%
- Potassium 180mg6%
- Total Carbohydrate 46g16%
- Dietary Fiber 2g8%
- Sugars 4g
- Protein 6g12%
- Vitamin A 350 IU
- Vitamin C 4 mg
- Calcium 40 mg
- Iron 1.5 mg
- Vitamin K 6 mcg
- Thiamin 0.2 mg
- Phosphorus 120 mg
- Magnesium 35 mg
- Zinc 1 mg
- Selenium 8 mcg
* Percent Daily Values are based on a 2,000 calorie diet. Your daily value may be higher or lower depending on your calorie needs.
Ghee Rice, Ghee Bhat, Neychoru, Pulao Recipes, Rice Recipes,